Guides for each feature
Learn how to best use the GPS tracking software with our tutorials and find out how to always keep an eye on your vehicles.
The guides are divided into sections for each of the main features of the system. Within each section you will find useful information to make the most of each function.

Billing
1. How to set a payment method
To use the Balin.app service you will need to enter a payment method.
You can use a prepaid or credit card (during data entry you can check the compatibility of your cards
and choose the payment method you prefer).
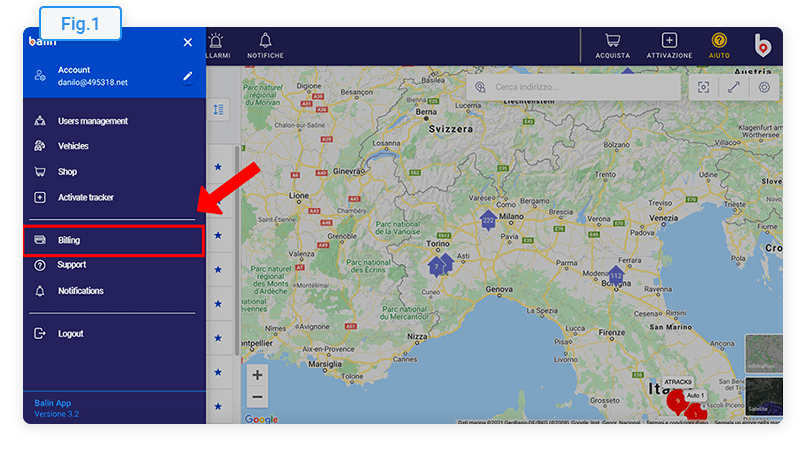
First, log in to Balin.app and from the main menu go to the Billing page,
as shown in Fig.1
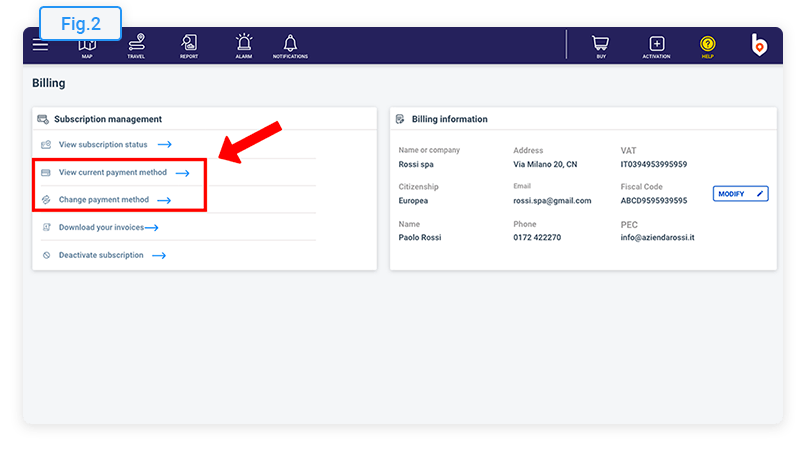
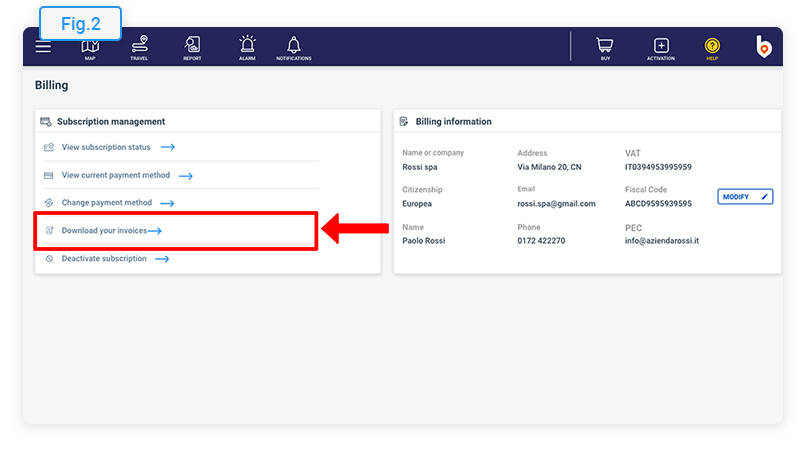
Go to the area of your subscription management and open the page where you can enter a new payment method. (Fig.2)
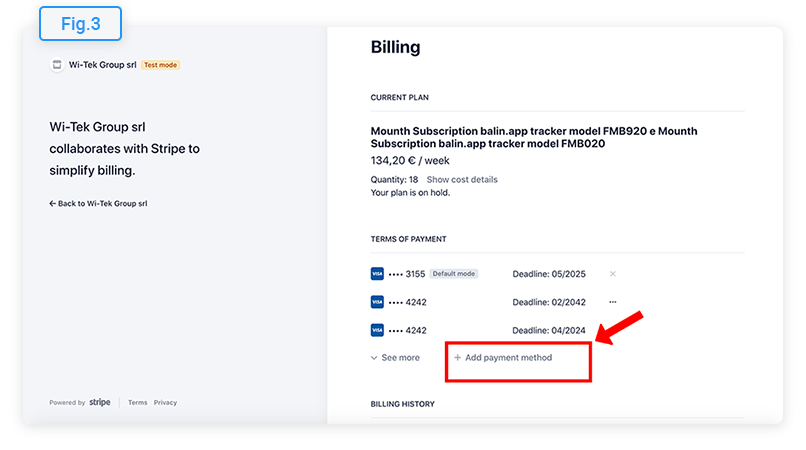
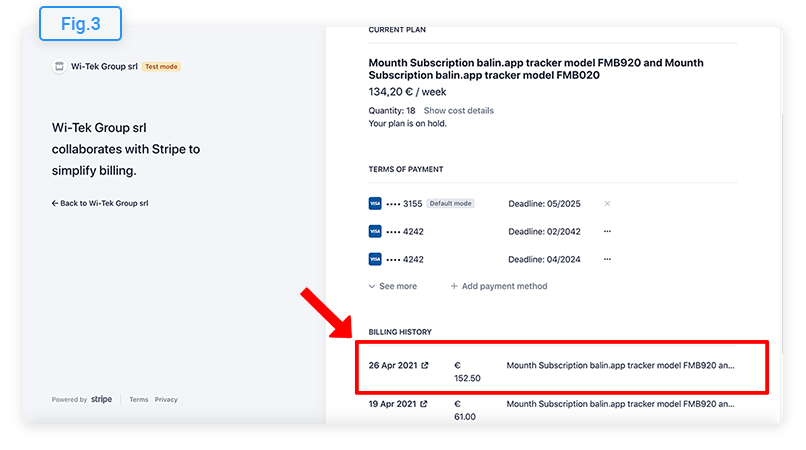
Click the button to add a payment method, as shown in Fig.3 and enter the details of a valid payment card to complete the operation.
You can repeat the procedure at any time to update or change your payment method.
2. How to download invoices
First, log in to Balin.app and from the main menu go to the Billing page, as shown in Fig.1
Go to the area of your subscription management and open the page where you can download invoices (Fig.2)
After opening the page, go to the billing history section. You will see the list of all the transactions made. Click on the transaction whose documents you want to download, as shown in Fig.3
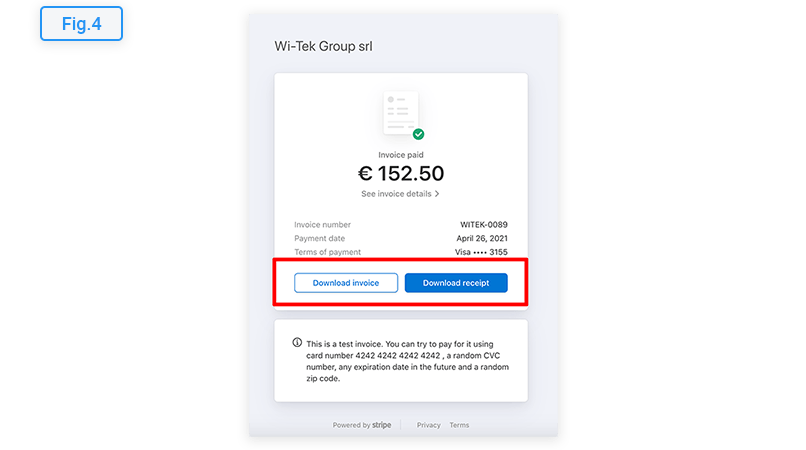
Finally, the payment details window will open, where you can download the invoice (or receipt). (Fig.4)
Travel history
1. Vehicle selection and map display
You can run the route history function by clicking on the corresponding
item in the main menu bar, or from the detail section of a vehicle.
First you have to select the vehicle whose route you want to consult and
choose the desired time range (Fig.1).
At the end of the choice, click on the VIEW TRAVEL
button to start
processing the history of the route taken.
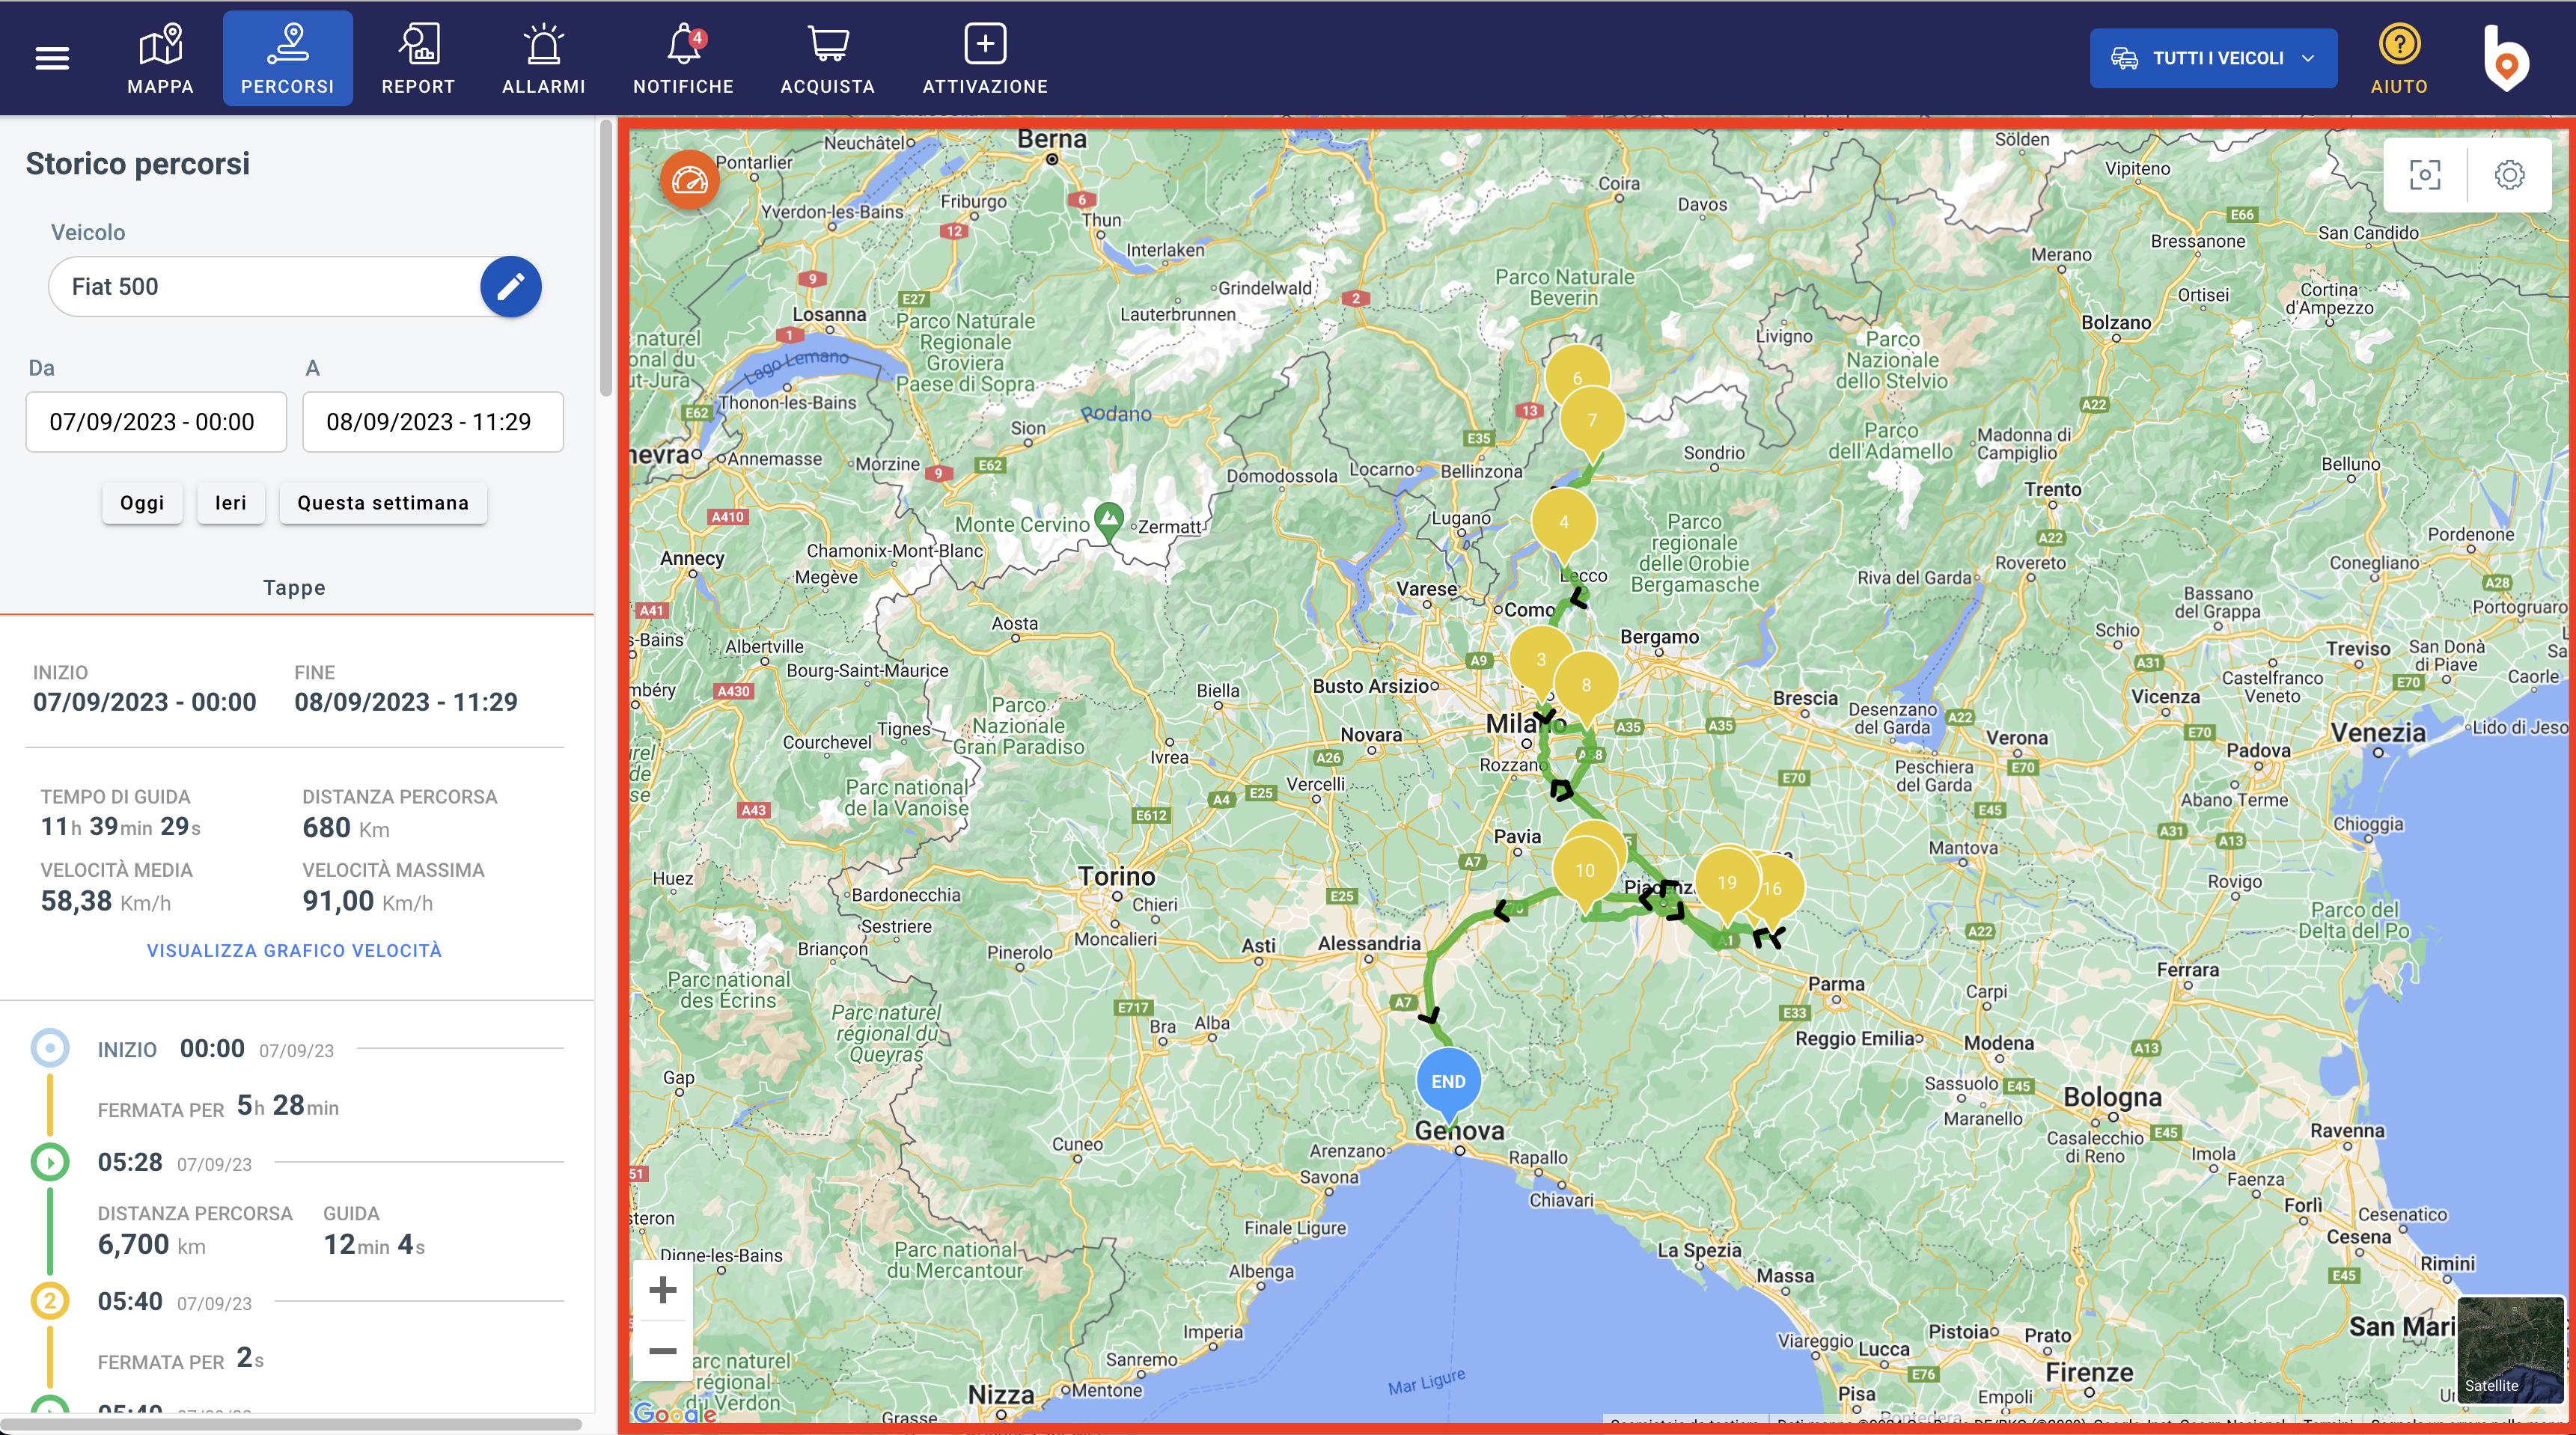
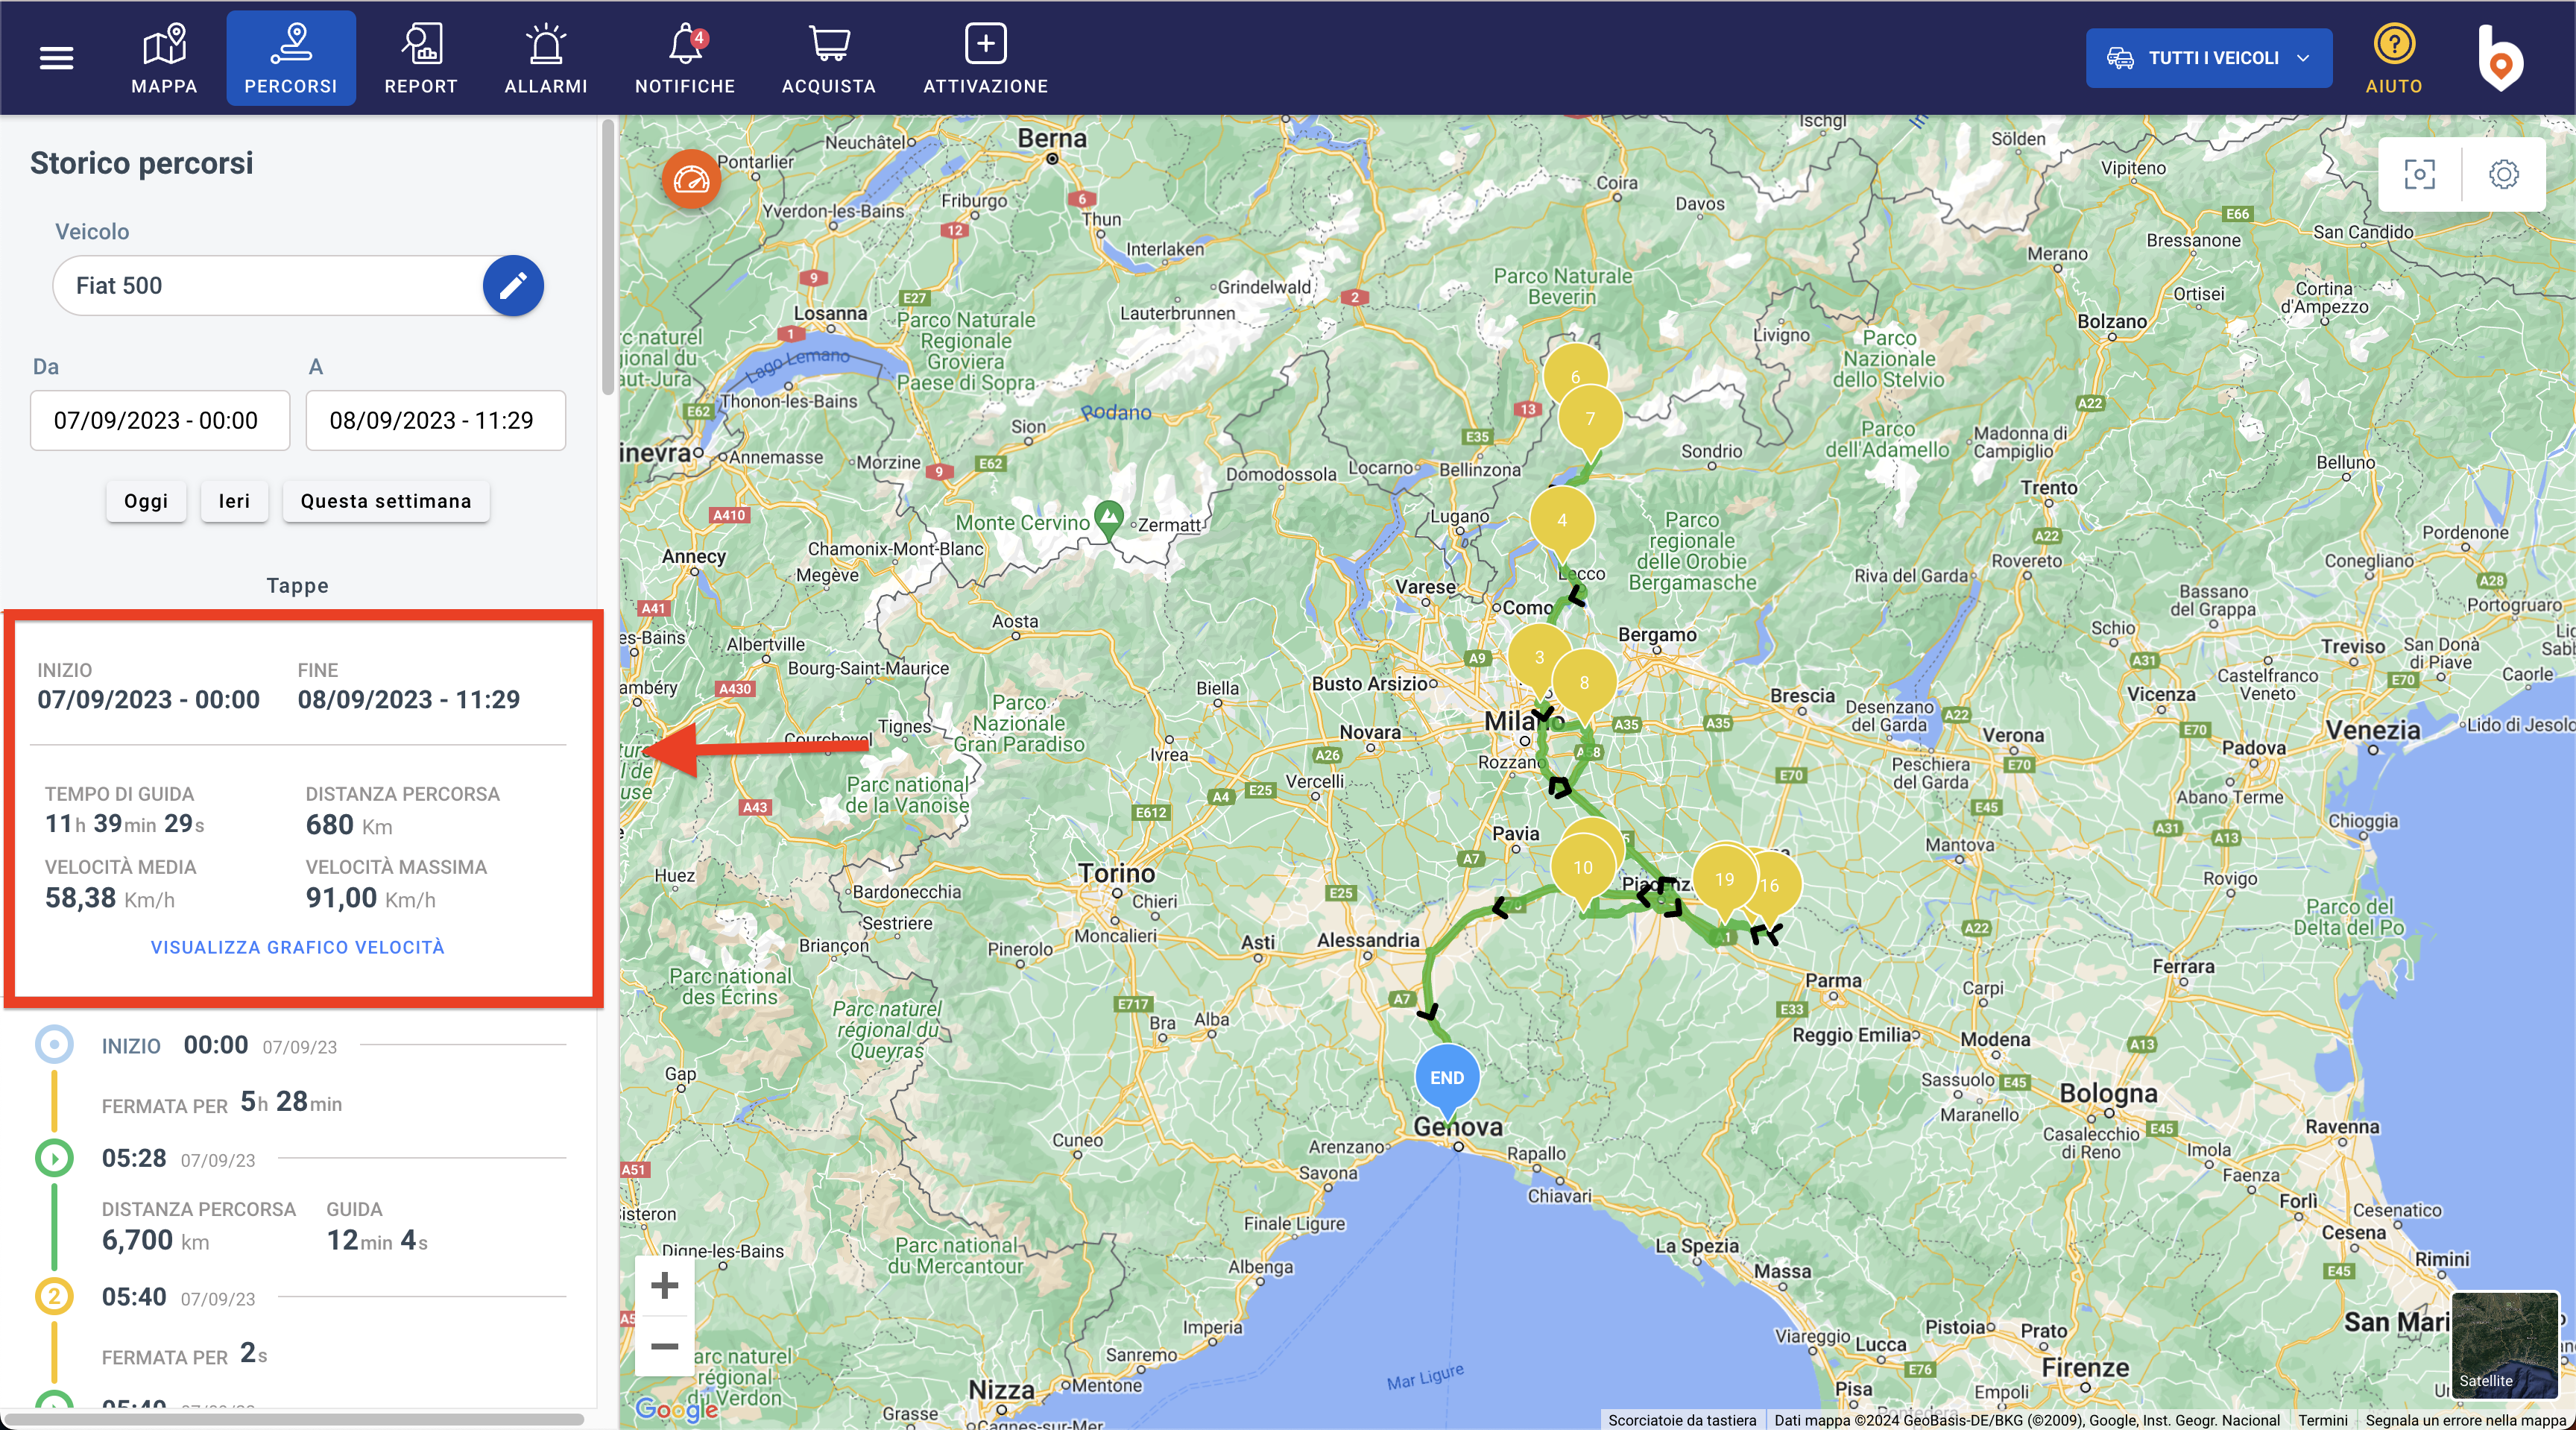
The route taken by the vehicle is marked on the map by the green line,
as shown in the figure (Fig.2). The
blue markers indicate the start and end of the route, while the yellow
markers indicate the stops made. Clicking on a marker opens a window with
the details of the selected location, such as the duration of the stop
and the exact address of the location.
By clicking on the settings (top right on the map) you can choose
to show or hide the stops and the directional arrows.
Note: in the case of routes referring to several days, on the same
or similar routes, the directional arrows may overlap, therefore we recommend
in this case to hide them temporarily to avoid getting confused.
On the map there are also buttons to zoom in or out, and you can also
choose to switch between the street map view (default) and the satellite
map view.

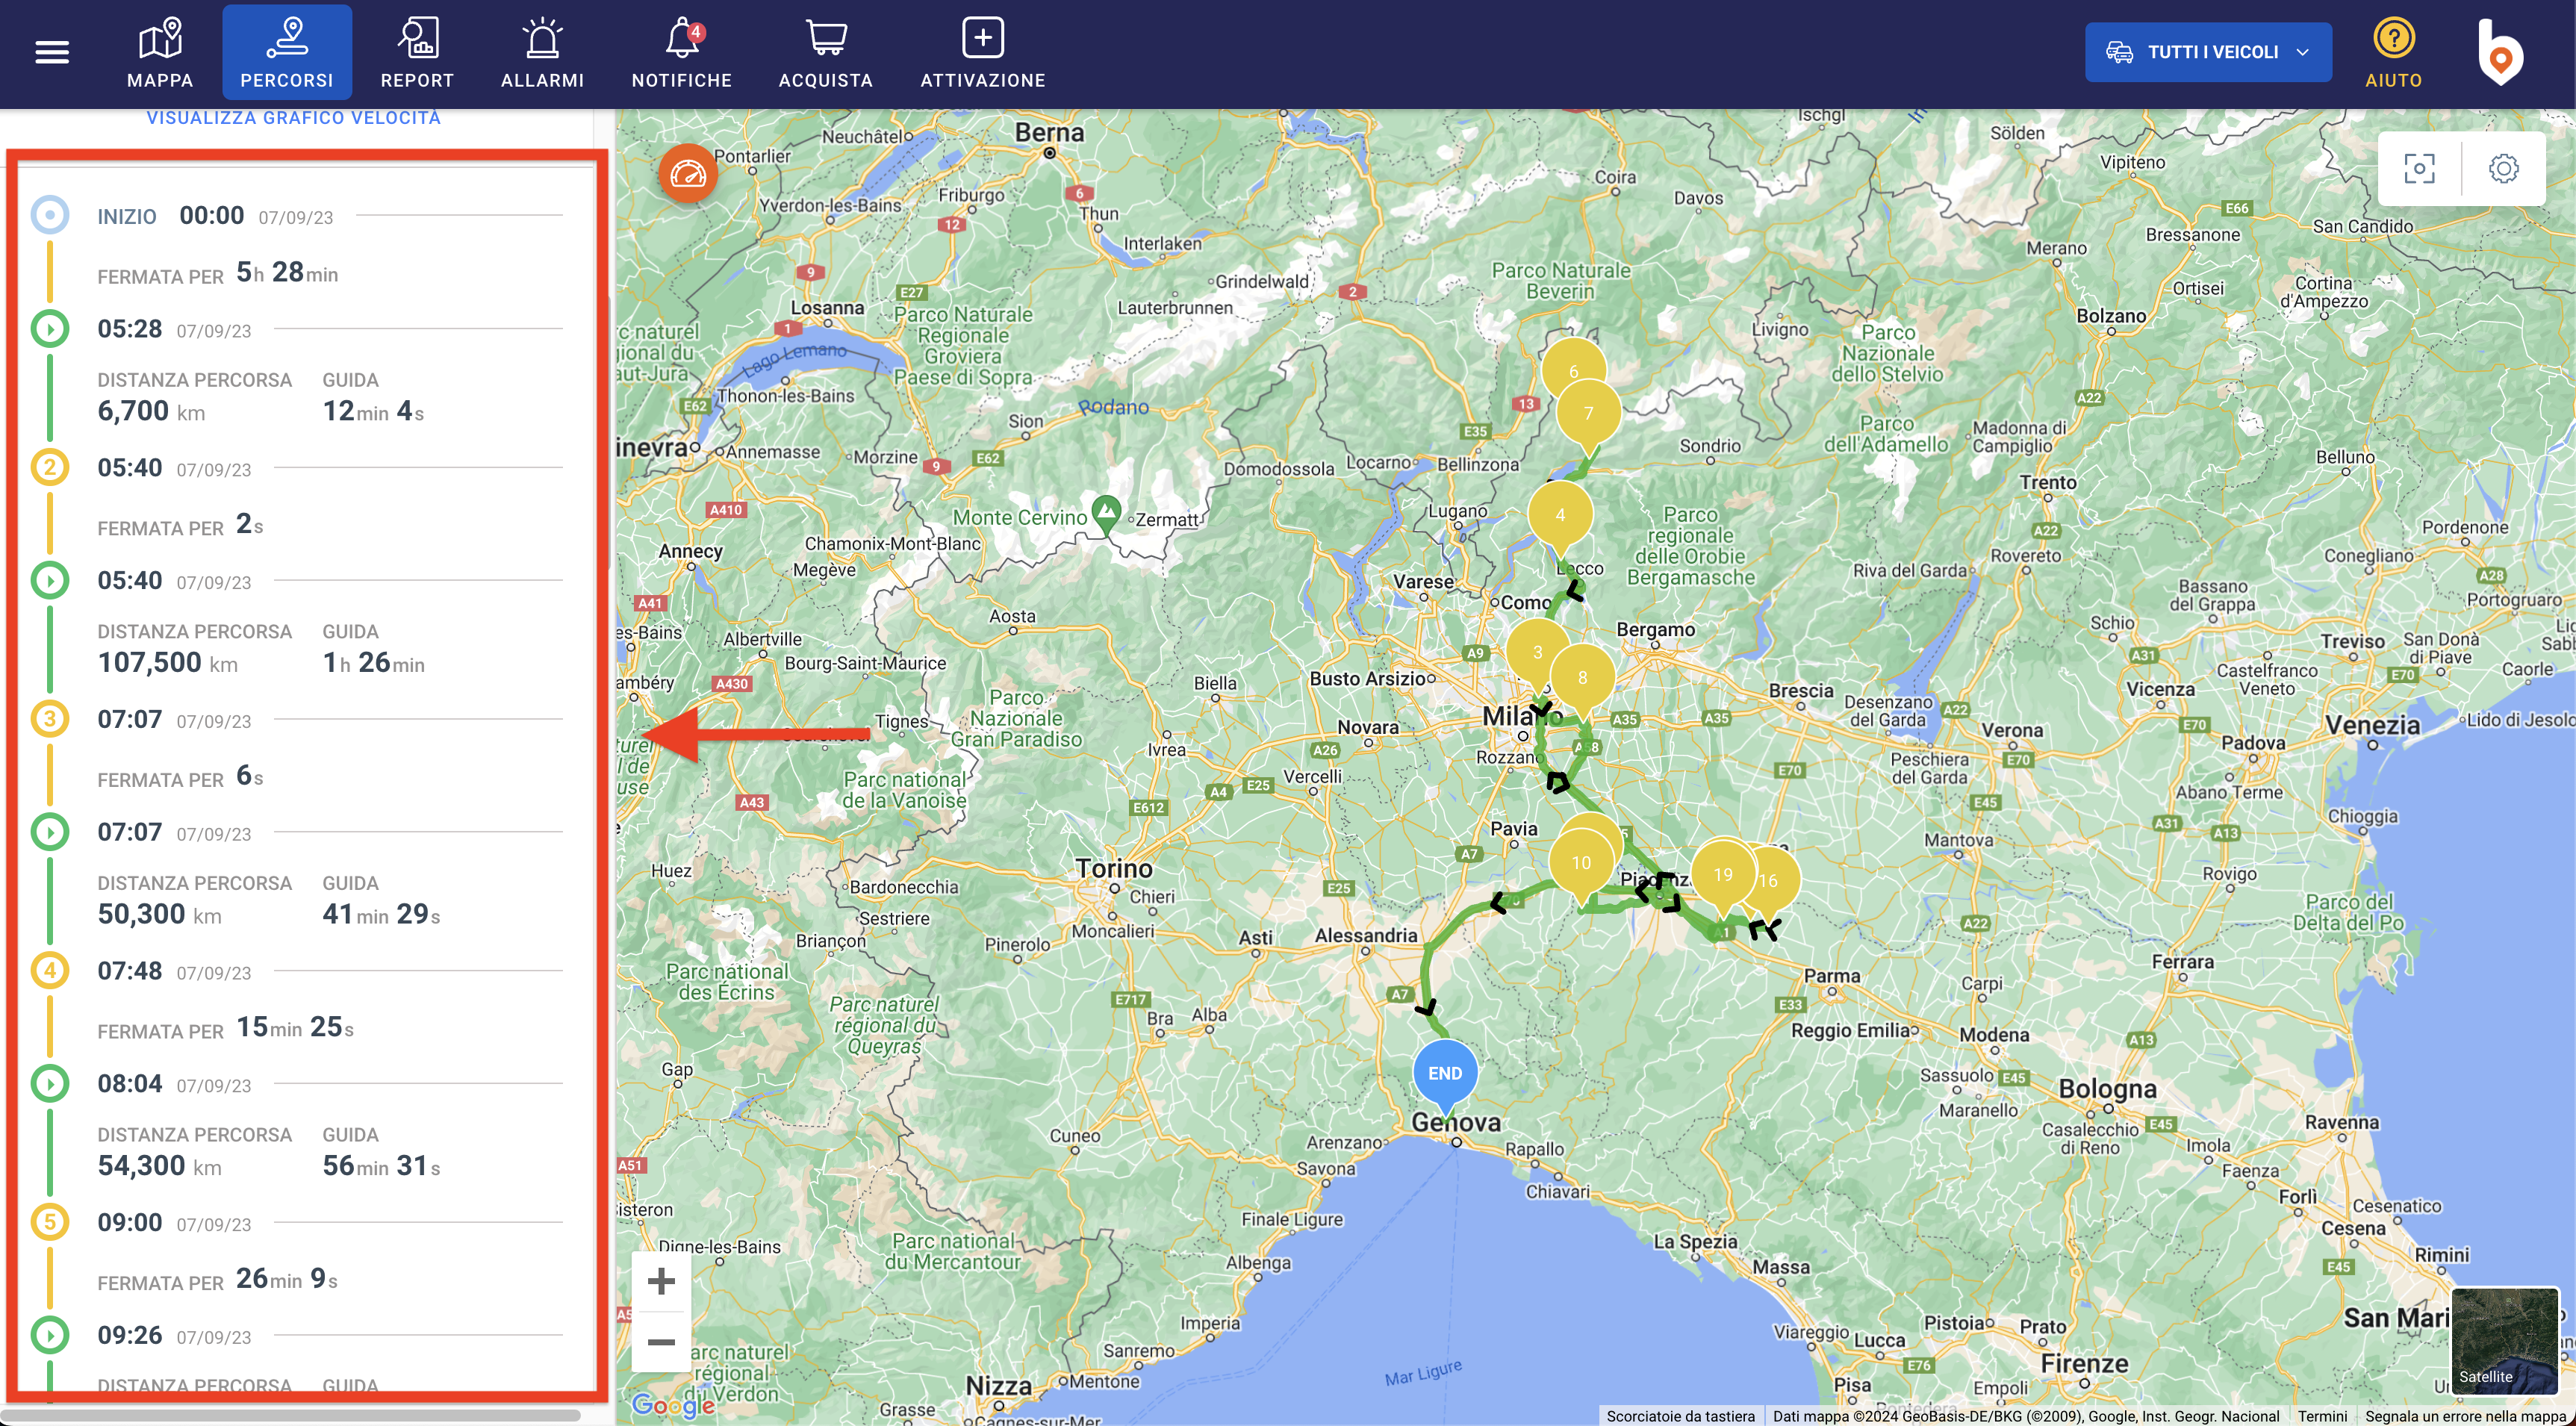
2. Checking of the waypoints and summary of the travel
The section on the left (Fig.1) shows
all the waypoints made by the vehicle during the selected route. All
the details relating to the route are indicated, such as the start and
end dates, the distance traveled between one waypoint and the next, and
all the information on driving or stopping times.
The line is green when the vehicle was traveling, and yellow when the
vehicle was parked.
Example: in the case shown in Fig.2 we see that the selected vehicle remained stationary until 08:40 on March 30, 2021. Then, it set off for 7 minutes and 35 seconds, and in this stretch it traveled 4 Km then stopped at 08:48 (waypoint 2 marked in yellow), and remained stationary for about 37 minutes. At 09:25 he set off again (green arrow) and traveled 0.5 km in 2 minutes and 35 seconds, before stopping at the next waypoint (waypoint 3 marked in yellow). And so on until the end of the selected path...
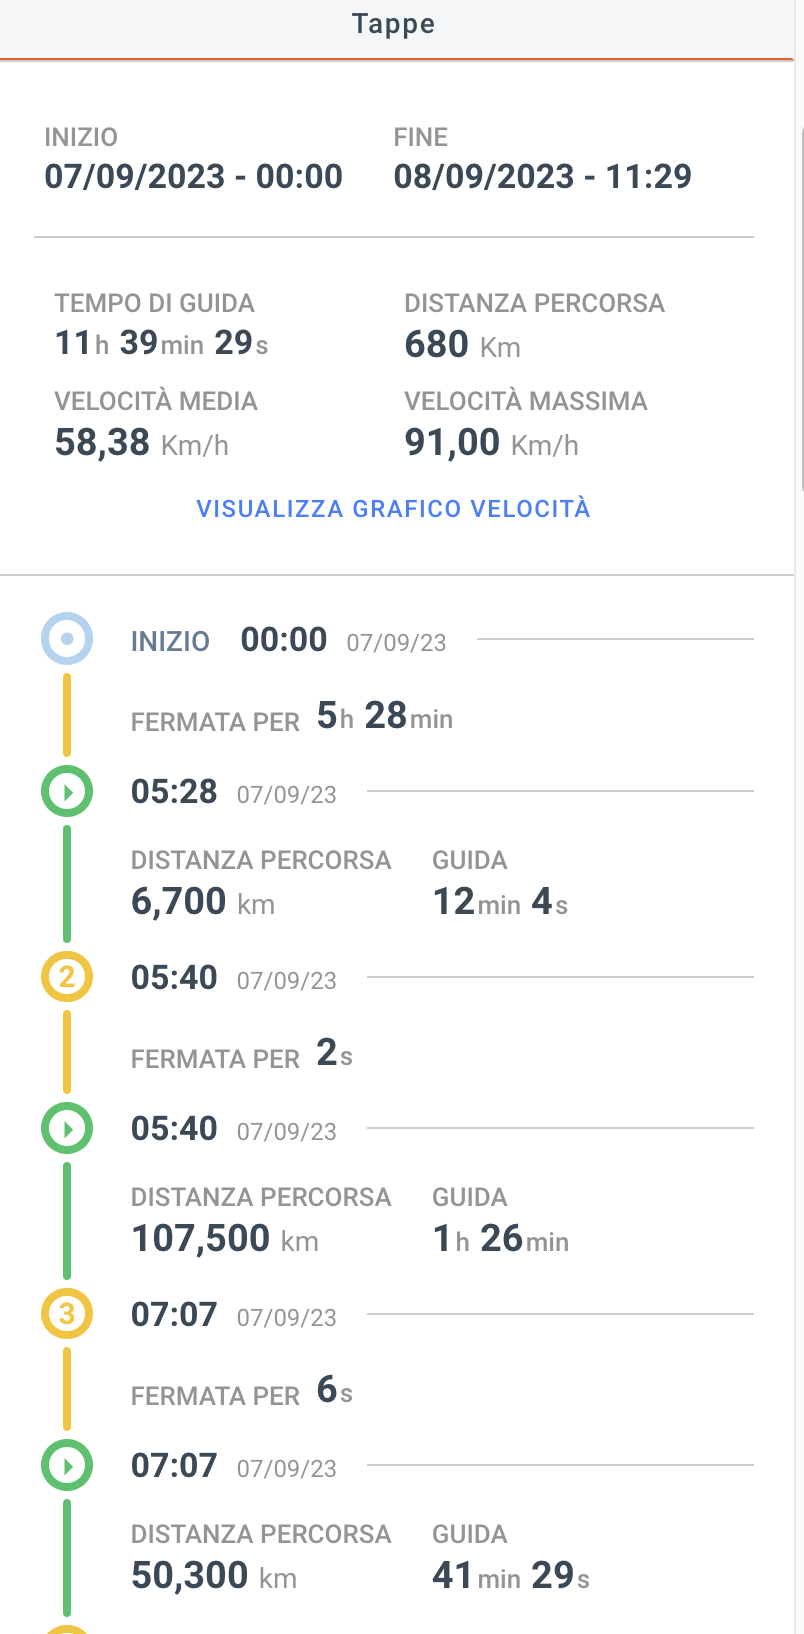
The summary (Fig.3) contains all the most important information relating to the travel: start and end date and time, the time spent parked, the total distance traveled and the data relating to the speed sustained by the vehicle.
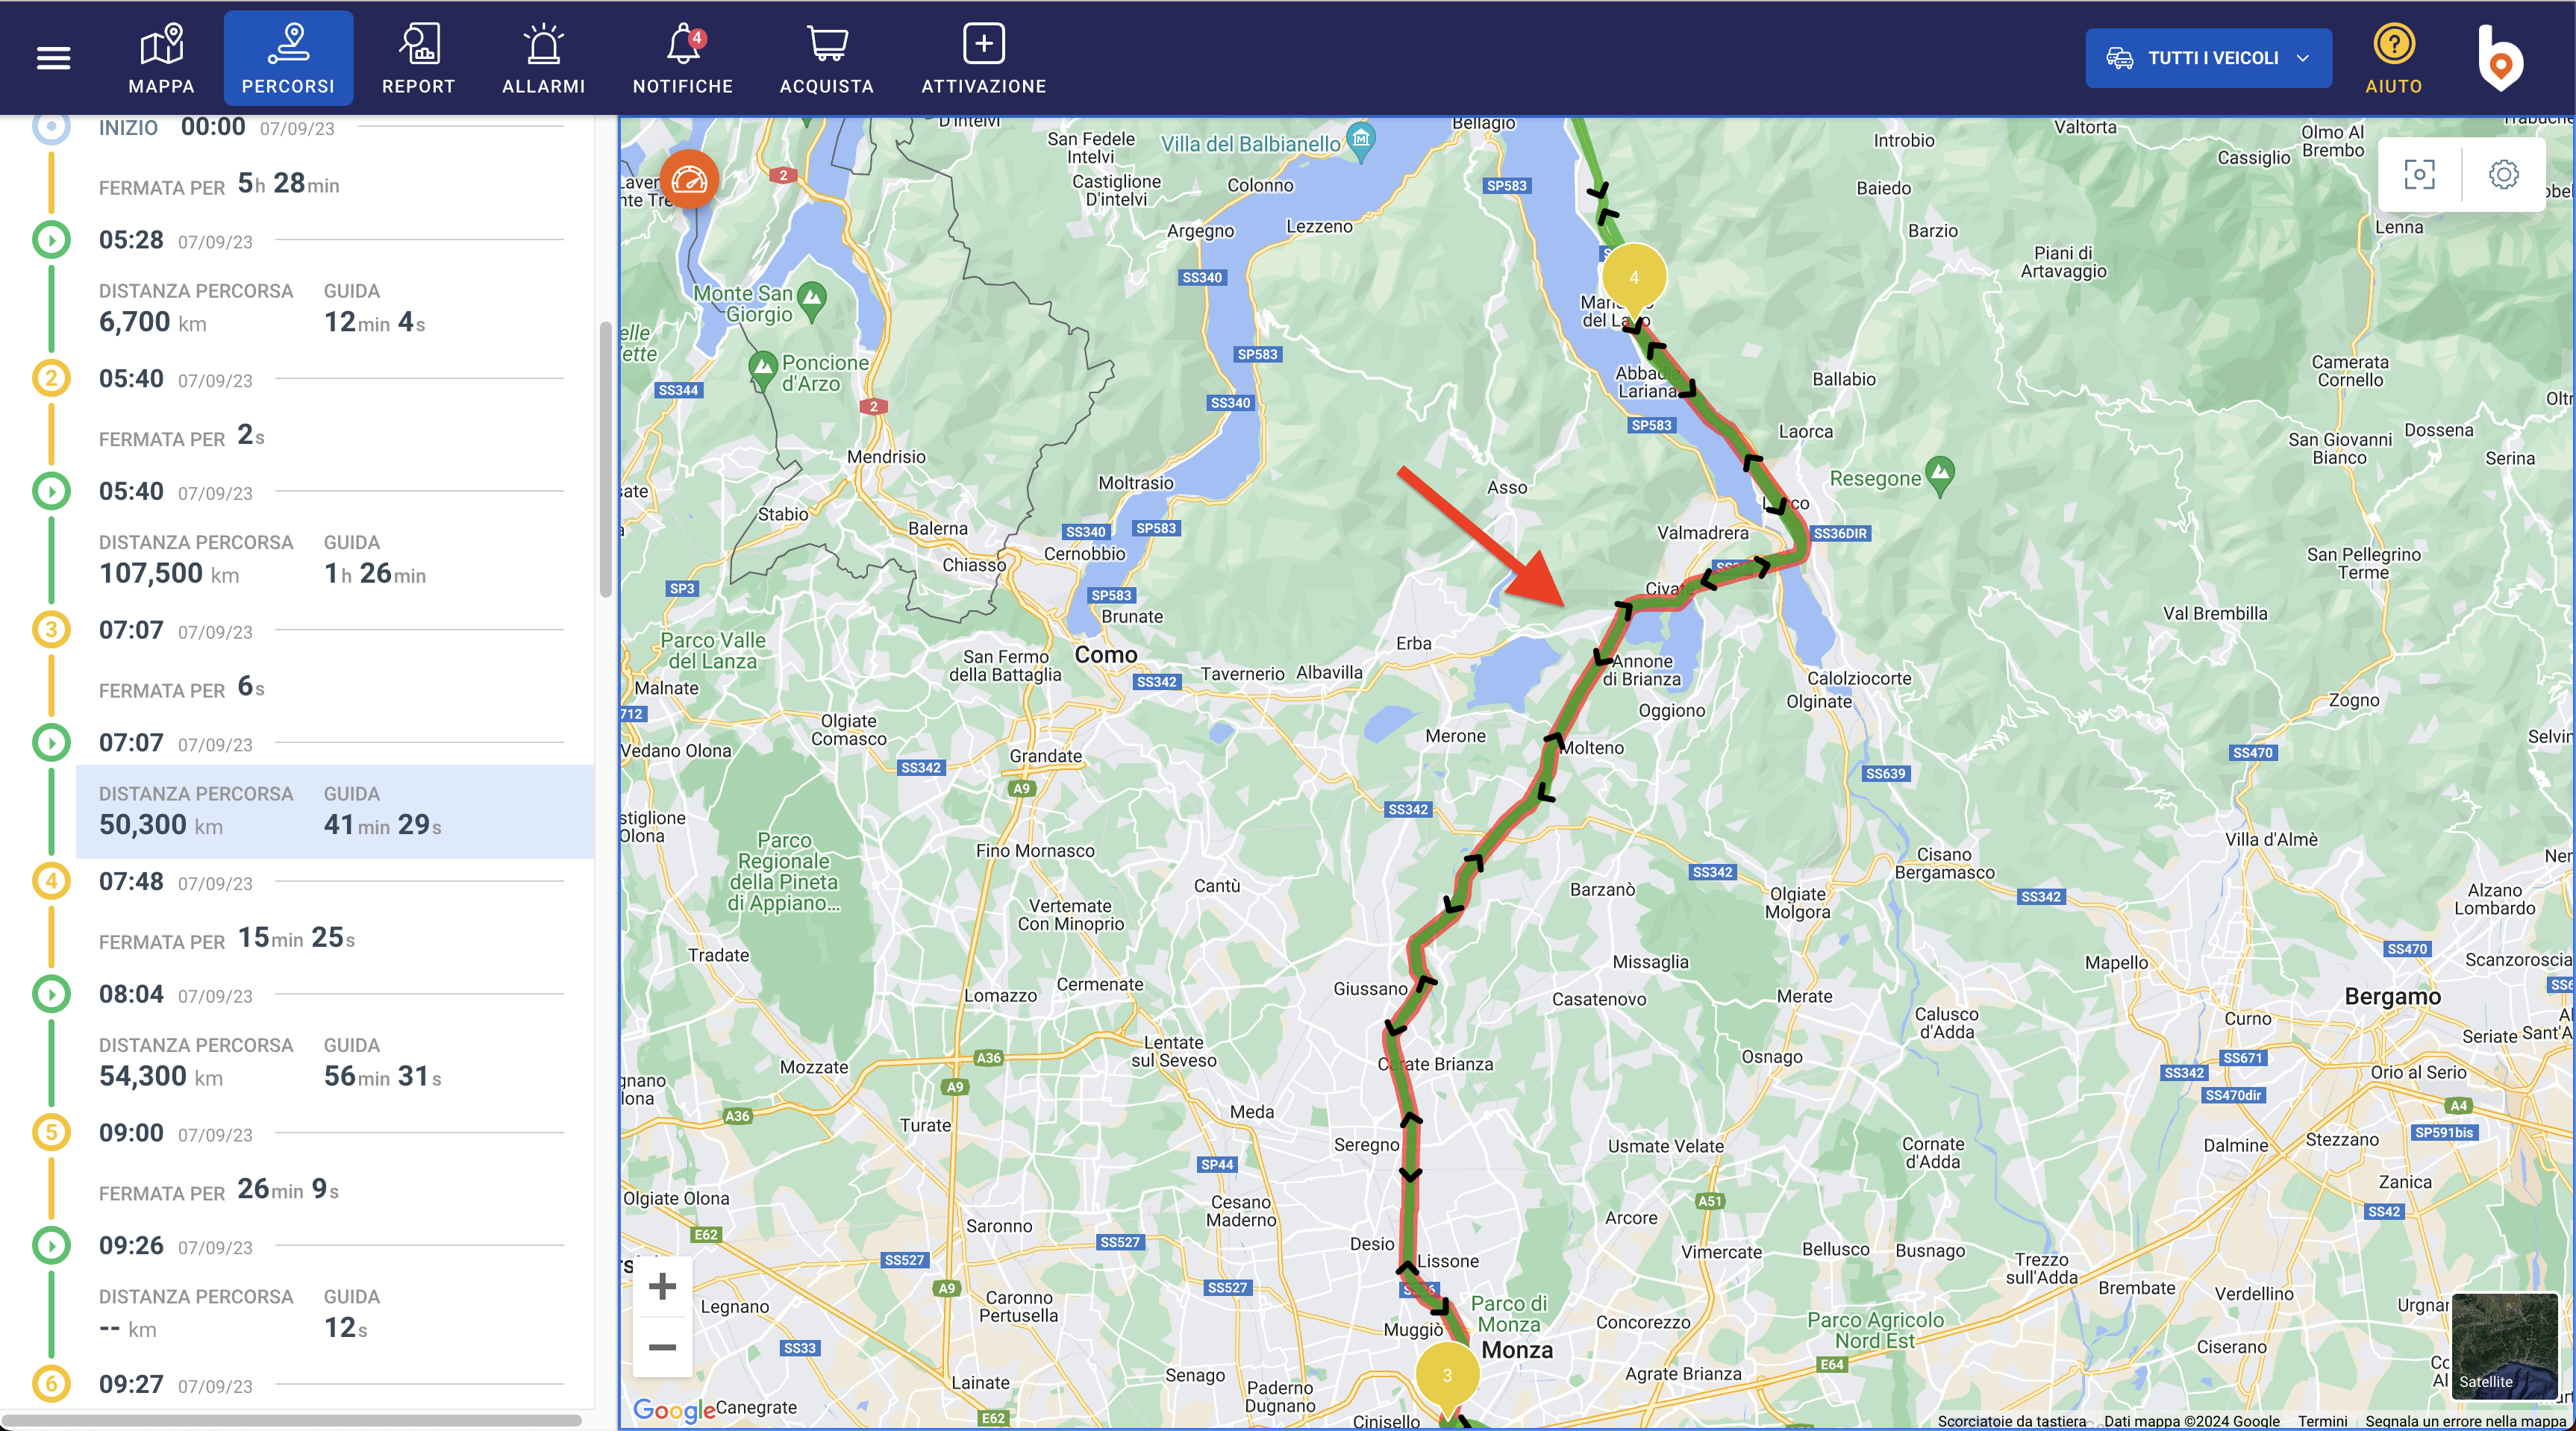
If you want to focus the analysis on a single stretch of the route, you
can click on a single part of the route (or stop), and the portion of the
route relative to the selected moment will be highlighted on the map, as
shown in Fig.4
Click in another point on the map to return to the default view.
3. Video tutorial
Vehicle report
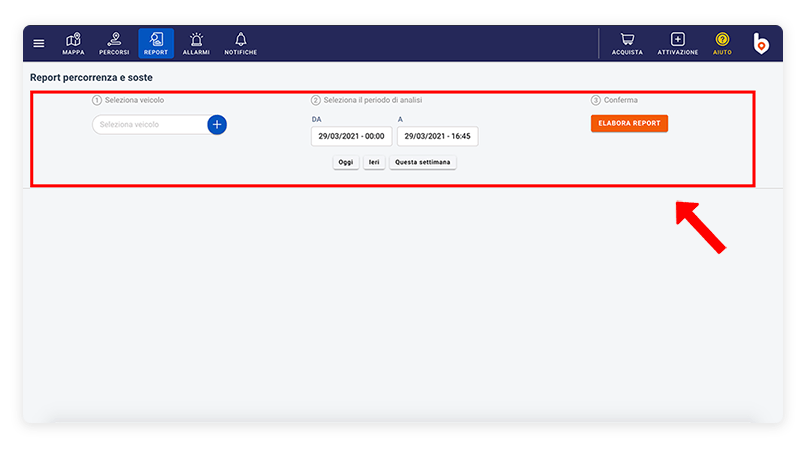
1. Vehicle selection and time range
You can run the report function by clicking on the corresponding
item in the main menu bar, or from the detail section of a vehicle.
First you have to select the vehicle whose report you want to consult
and choose the desired time range. Once you have made your choice, click
on the START REPORT button to start processing the vehicle performance
report.
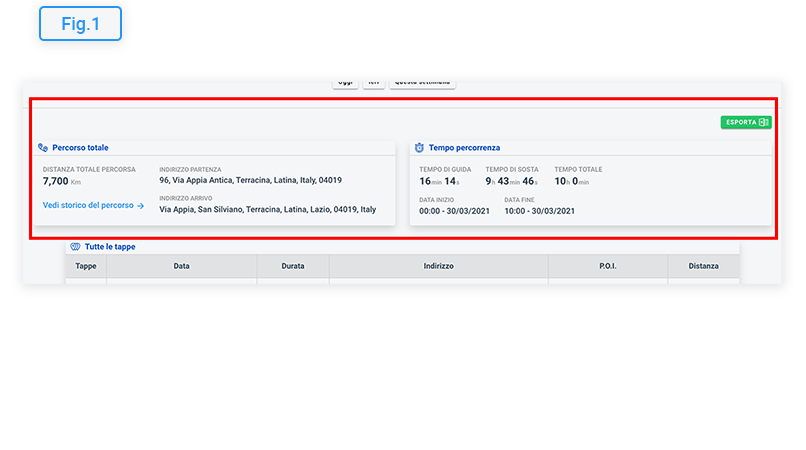
2. Data analysis and checking of the waypoints
The first part of the report (Fig.1)
summarizes the main data relating to the activities of the vehicle in the
selected time frame.
In the complete travel, the starting address and the arrival address
are indicated, with the total number of kilometers traveled. If you wish,
you can directly check the history of the route taken.
In travel time you can find all the information on driving and parking
times, as well as the date and time of the start and end of the report.
The green button EXPORT (top right) allows you to export and
download the selected report in Excel® format.
In the example shown in Fig.1 we see that the vehicle has traveled 7.7 km in the selected time span, and with a total time of 10 hours, spent 9 hours and 43 minutes parked and traveled for about 16 minutes.
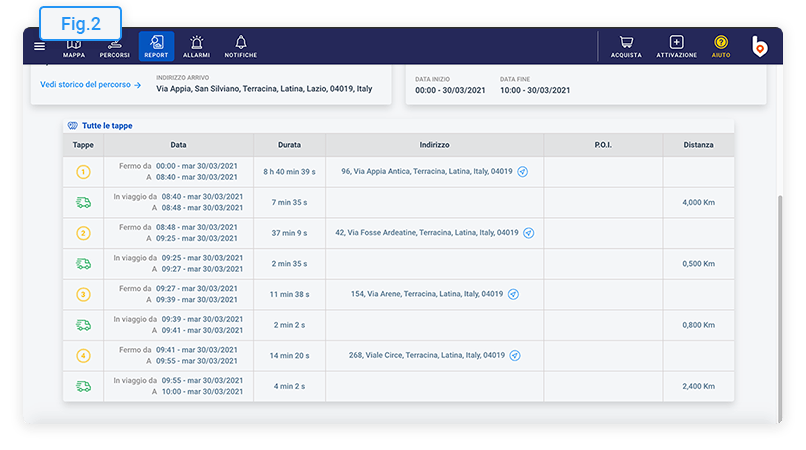
All the waypoints of the vehicle are summarized in the report table ( Fig.2). The waypoints column shows all the stops (yellow numbers) and the stages of the journey (green icon), while the following columns (from left to right) show information about:
- Date e ora
- Duration of the trip or stop
- Address, for the locations where the vehicle is parked
- P.O.I. or points of interest, if the vehicle has passed through points of interest entered by the user
- Distance traveled by the vehicle
Speed limit alarm
1. How does the speed alarm work?
You can set a speed limit alarm if you want to be alerted when a
vehicle exceeds a limit you set.
After you activate the alarm, every time the vehicle exceeds the speed
limit you will receive an immediate notification on the Balin App and by
email. This way you can make sure that those who drive your vehicles maintain
a prudent and safe driving behaviour.
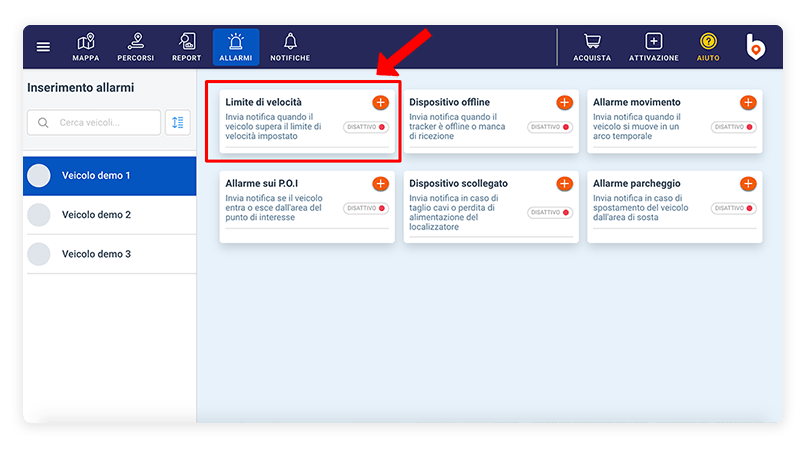
2. How to activate the speed alarm
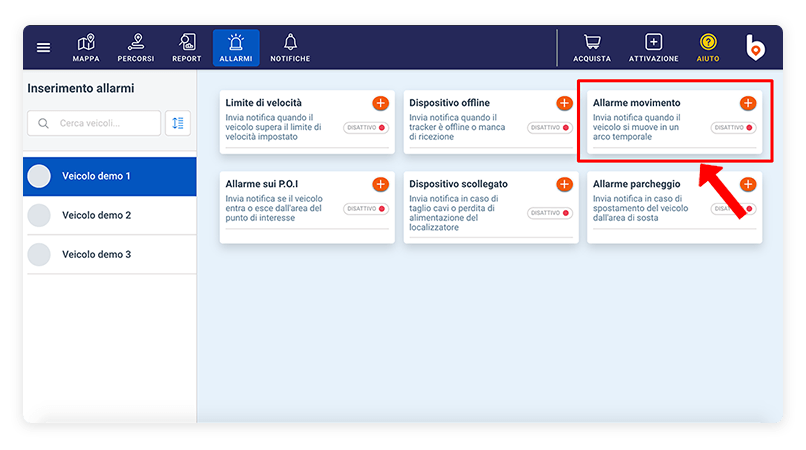
First you need to select the vehicle on which you want to arm the alarm. Then, click on the button and starts the wizard to activate the alarm.
Step 1: choose whether to arm the alarm on the selected vehicle
or on all vehicles, and click on CONTINUE, as shown in Fig.1
Note: if you choose to arm the alarm on all vehicles, and there
are some vehicles that already have a speed alarm set, a message will ask
you if you want to replace the new alarm with the previous ones.
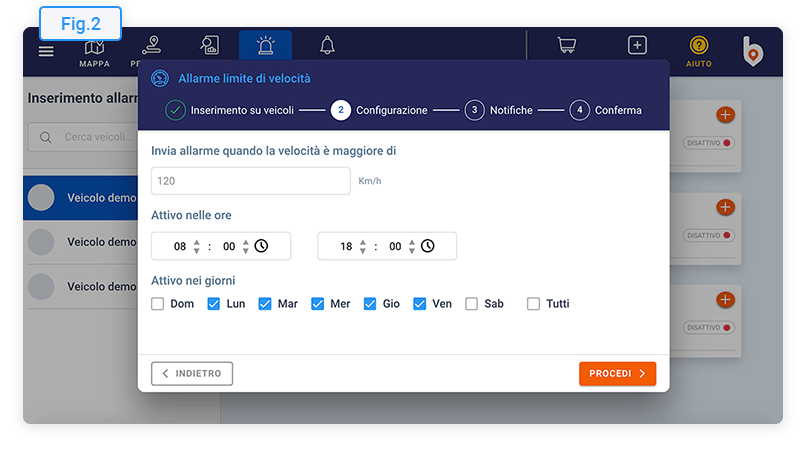
Step 2: enter the speed limit and the hour and day settings. In the example shown (Fig.2) a limit of 120 Km/h has been entered, and the alarm will be activated from Monday to Friday, from 08:00 to 18:00. According to these settings, the user will be notified every time the vehicle exceeds 120 km/h, at the time and on the selected days.
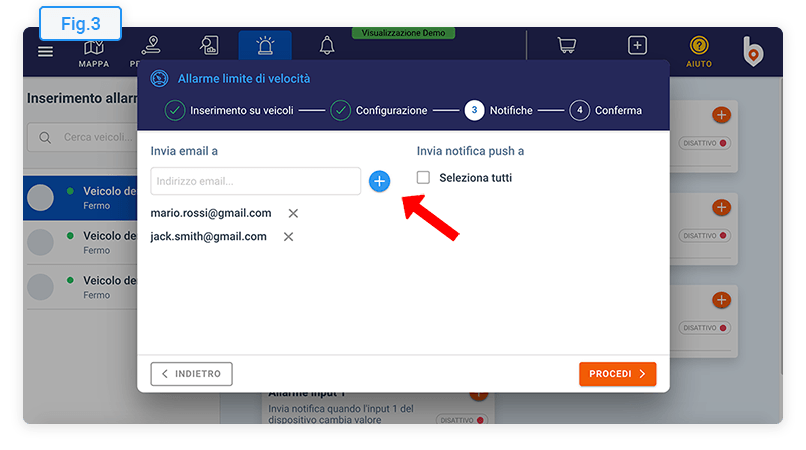
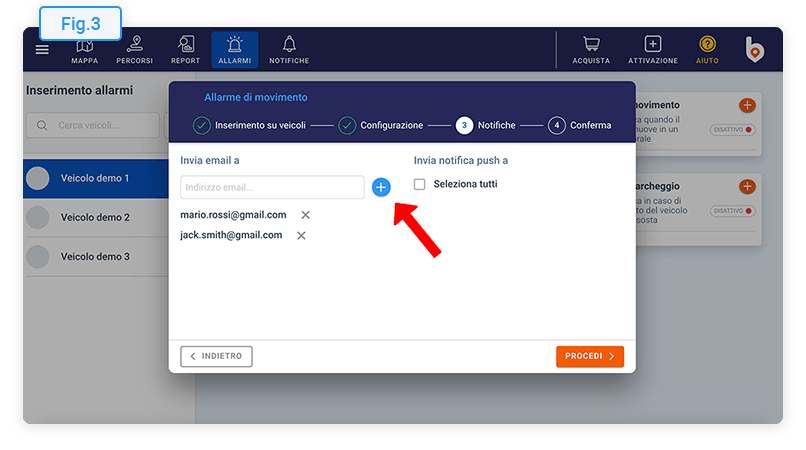
Step 3: choose who to send notifications to when the alarm is triggered (Fig.3). Type the email addresses to which you want to send the message and click on the button to add them as recipients. You can also choose to send notifications to secondary users in Balin.app.
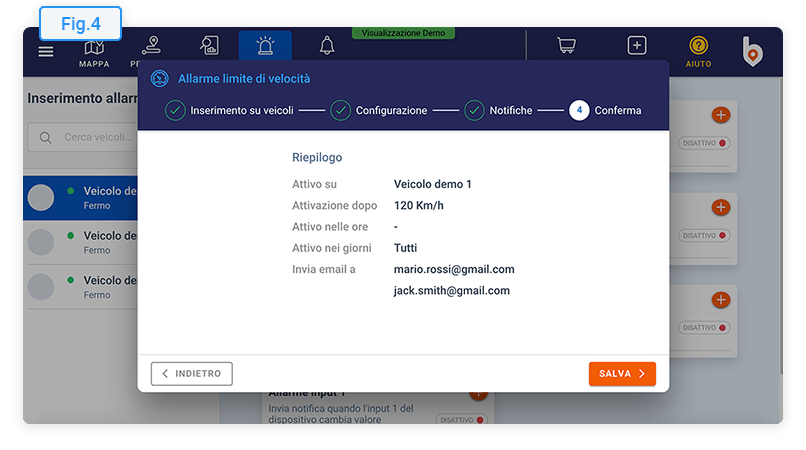
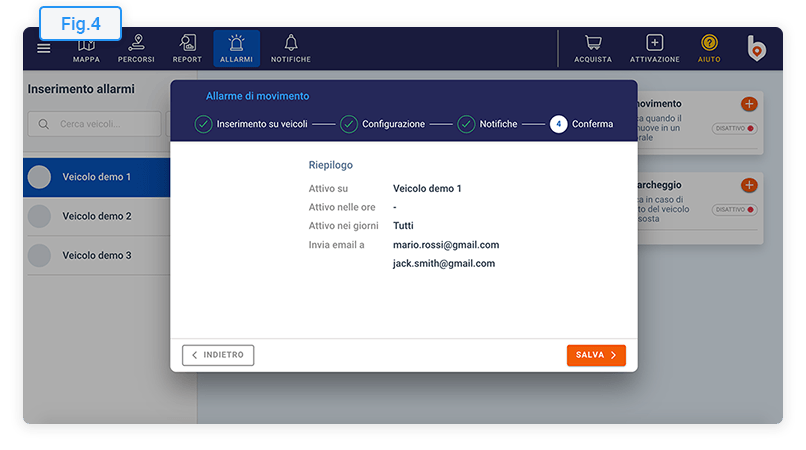
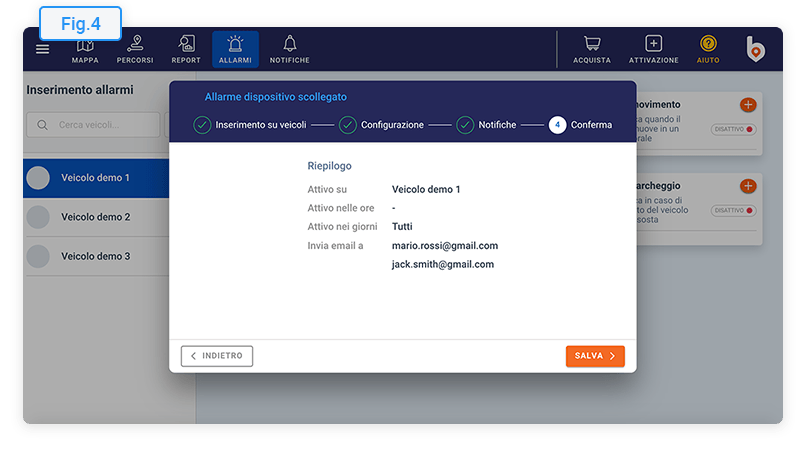
Step 4: Check the summary to verify that all settings are correct and press SAVE to confirm the alarm activation. (Fig.4).
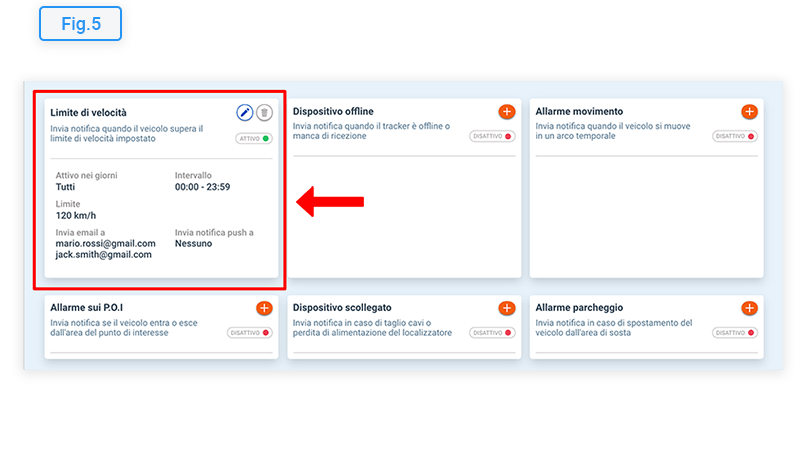
As soon as you have completed the procedure you will see that the speed
alarm is active with the settings you have chosen, as shown in Fig.5
Click on the pencil icon to
edit the alarm, or on the trash if
you want to delete it.

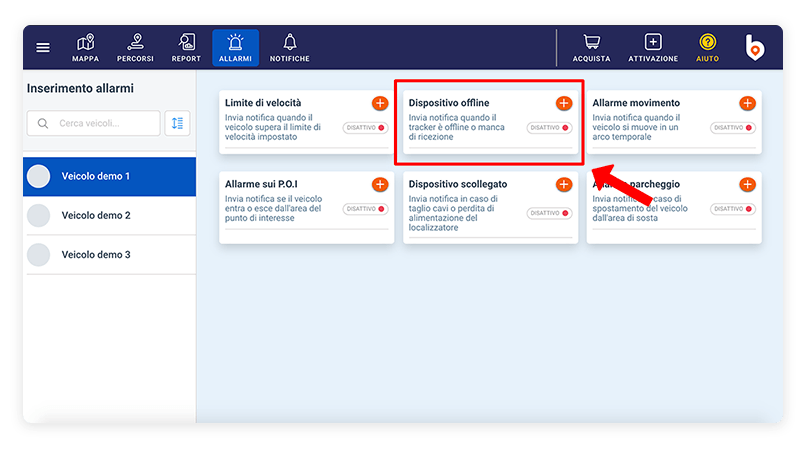
Offline device alarm
1. How does the offline device alarm work?
You can set an offline device type alarm if you want to receive an
alert when the GPS tracker loses signal or stays offline for a long time.
After you have activated the alarm, when the GPS tracker suffers delays
in receiving the signal (for example if it remains in a closed place such
as a garage, a shed, a tunnel, etc.) you will receive an immediate notification
on the Balin App and by email. In this way you can always stay up to date
in case of reception problems and intervene in situations of need.
2. How to activate the offline device alarm
First you need to select the vehicle on which you want to arm the alarm. Then, click on the button and starts the wizard to activate the alarm.
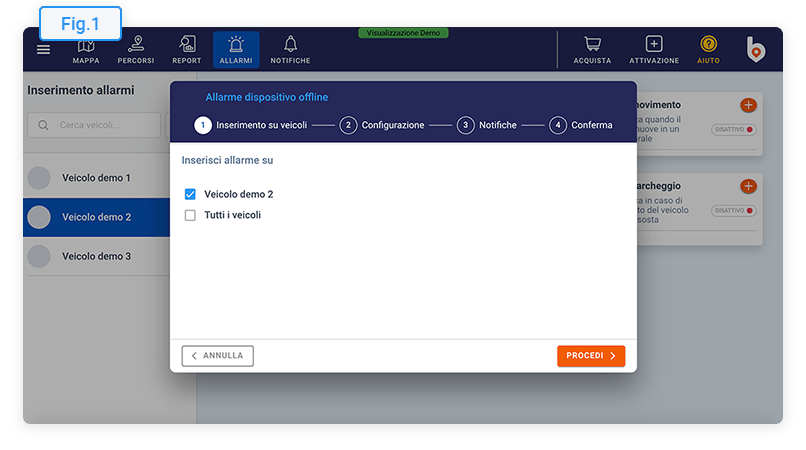
Step 1: choose whether to arm the alarm on the selected vehicle
or on all vehicles, and click on CONTINUE, as shown in Fig.1
Note: if you choose to arm the alarm on all vehicles, and there
are some vehicles that already have an offline device alarm set, a message
will ask you if you want to replace the new alarm with the previous ones.
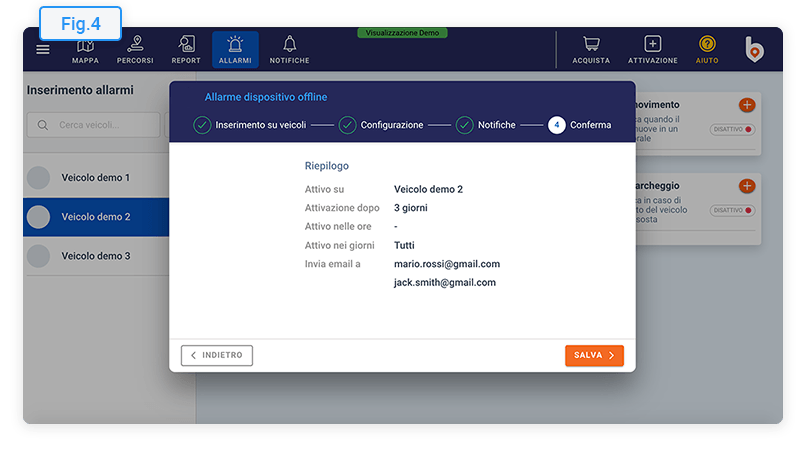
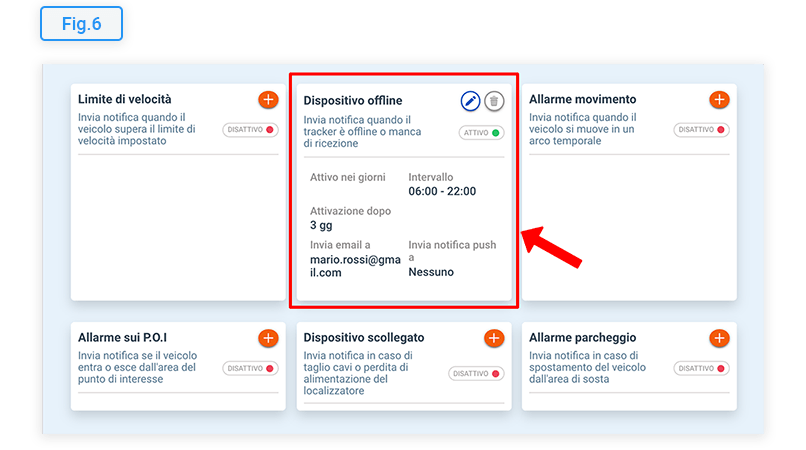
Step 2: you can choose to activate the alarm after the device is offline for 1 or more days. In the example shown (Fig.2) it has been established that the alarm will be triggered if the device remains offline for 3 days, and the alarm will be activated every day, from 06:00 to 22:00. According to these settings, the user will be notified at the selected times, if the GPS tracker remains offline for at least 3 days.
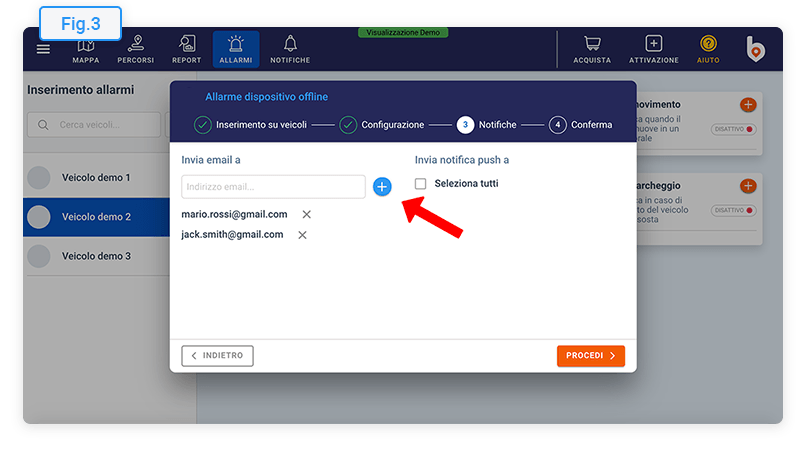
Step 3: choose who to send notifications to when the alarm is triggered (Fig.3). Type the email addresses to which you want to send the message and click on the button to add them as recipients. You can also choose to send notifications to secondary users in Balin.app.
Step 4: Check the summary to verify that all settings are correct and press SAVE to confirm the alarm activation. (Fig.4).
As soon as you have completed the procedure you will see that the offline
device is active with the settings you have chosen, as shown in Fig.5
Click on the pencil icon to
edit the alarm, or on the trash if
you want to delete it.

Motion alarm
1. How does the motion alarm work?
You can set a motion alarm if you want to be alerted every time the
vehicle moves at a set time.
After you have activated the alarm, when the vehicle is moved within the
selected time frame, you will receive an immediate notification on the
Balin App and via email. In this way you can always stay updated on the
movements of your vehicles.
For example, it may be useful to know if the vehicle moves at an illegal
time (for example at night or on weekends) in order to avoid inappropriate
behaviour and use.
2. How to activate the motion alarm
First you need to select the vehicle on which you want to arm the alarm. Then, click on the button and starts the wizard to activate the alarm.
Step 1: choose whether to arm the alarm on the selected vehicle
or on all vehicles, and click on CONTINUE, as shown in Fig.1
Note: if you choose to arm the alarm on all vehicles, and there
are some vehicles that already have a motion alarm set, a message will
ask you if you want to replace the new alarm with the previous ones.
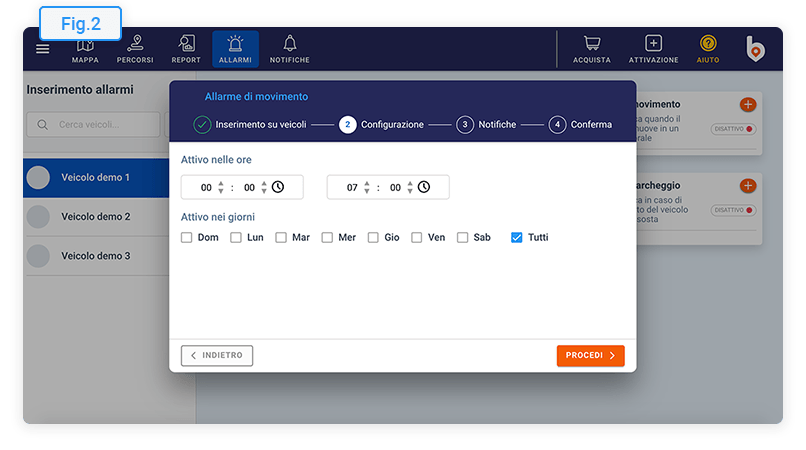
Step 2: You can choose to activate the alarm if the vehicle moves
at a time you set. In the example shown (Fig.2)
it has been established that the alarm will be triggered if the vehicle
is moved from 00:00 to 07:00 every day. According to these settings, the
user will receive a notification at the indicated times, every time the
vehicle moves in that time frame.
The settings shown in Fig.2 could be
taken as an example in case you want to receive an alert every time the
vehicle moves at night time (from 00:00 to 07:00).
Step 3: choose who to send notifications to when the alarm is triggered (Fig.3). Type the email addresses to which you want to send the message and click on the button to add them as recipients. You can also choose to send notifications to secondary users in Balin.app.
Step 4: Check the summary to verify that all settings are correct and press SAVE to confirm the alarm activation. (Fig.4).
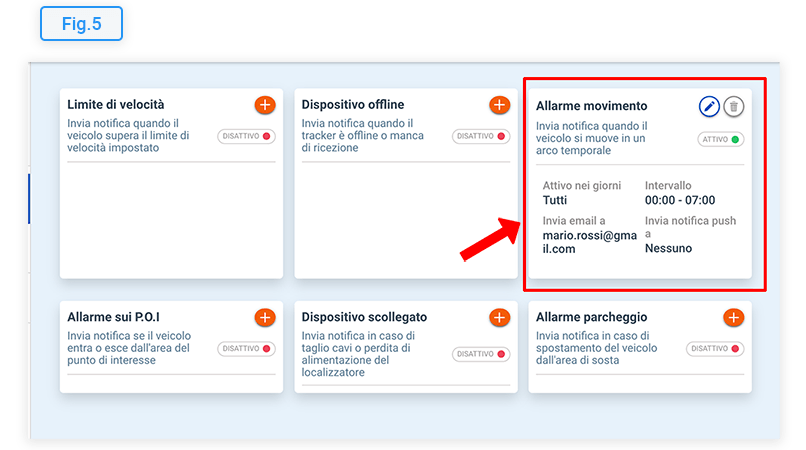
As soon as you have completed the procedure you will see that the motion
alarm is active with the settings you have chosen, as shown in Fig.5
Click on the pencil icon to
edit the alarm, or on the trash if
you want to delete it.

Parking alarm
1. How does the parking alarm work?
You can set a parking alarm if you want to be alerted every time
your vehicle moves from your current location at a set time.
After you have activated the alarm, when the vehicle (which was previously
stopped) moves within the selected time frame, you will receive an immediate
notification on the Balin App and via email. In this way you can always
stay updated on the movements of your vehicles.
For example, you may find it useful to know if the vehicle moves from
its current location during the selected time. This alarm can be very useful
to be notified promptly in case of theft of the vehicle.
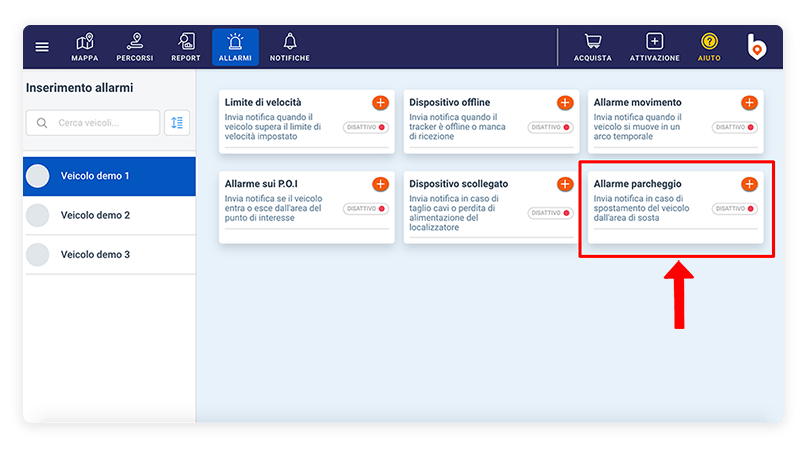
2. How to activate the parking alarm
First you need to select the vehicle on which you want to arm the alarm. Then, click on the button and starts the wizard to activate the alarm.
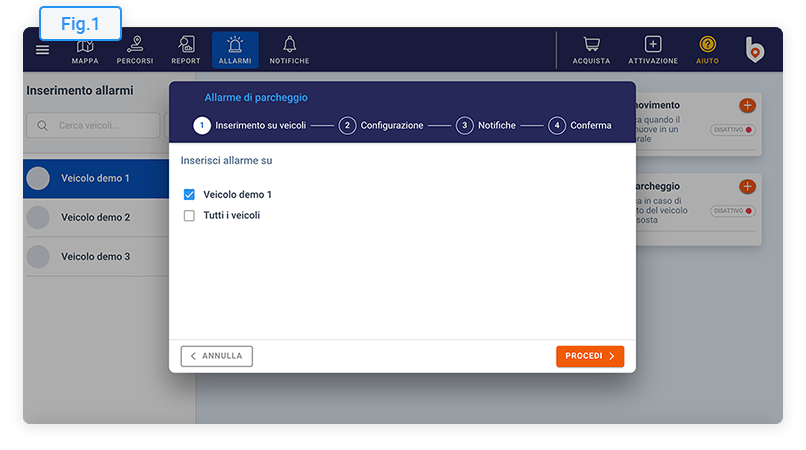
Step 1: choose whether to arm the alarm on the selected vehicle
or on all vehicles, and click on CONTINUE, as shown in Fig.1
Note: if you choose to arm the alarm on all vehicles, and there
are some vehicles that already have a parking alarm set, a message will
ask you if you want to replace the new alarm with the previous ones.
Step 2: You can choose to activate the alarm if the vehicle moves
from its current location at a time you set. In the example shown (
Fig.2) it has been established that the alarm will be triggered
if the vehicle moves on Sunday, from 10:00 to 12:00. According to these
settings, the user will receive a notification at the indicated times,
every time the vehicle moves in that time range.
For example, suppose you have parked your vehicle in the city and activated
the alarm. If the vehicle is moved or stolen between 10:00 and 12:00 on
Sunday, you will receive an immediate notification that will allow you
to take action if necessary.
Step 3: choose who to send notifications to when the alarm is triggered (Fig.3). Type the email addresses to which you want to send the message and click on the button to add them as recipients. You can also choose to send notifications to secondary users in Balin.app.
Step 4: Check the summary to verify that all settings are correct and press SAVE to confirm the alarm activation. (Fig.4).
As soon as you have completed the procedure you will see that the parking
alarm is active with the settings you have chosen, as shown in Fig.5
Click on the pencil icon to
edit the alarm, or on the trash if
you want to delete it.


Disconnection alarm
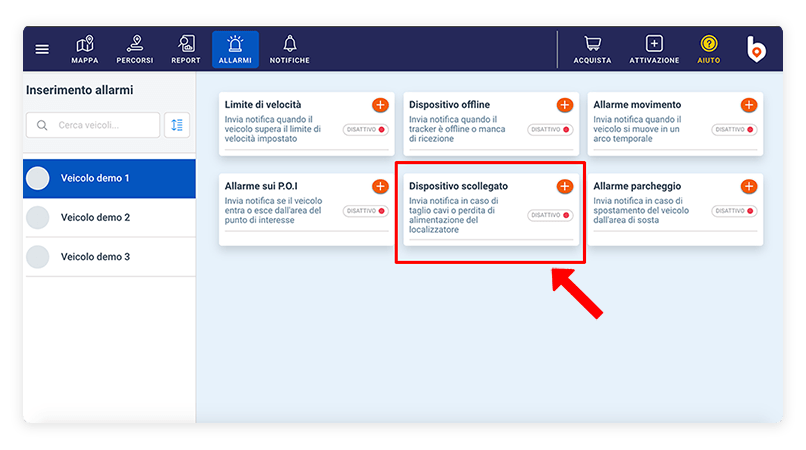
1. How does the disconnected or tampered device alarm work?
You can set device disconnected alarm if you want to receive an alert
whenever the GPS tracker is disconnected from the power supply or the cables
are cut.
After you have activated the alarm, in case the power cables are cut or
the GPS tracker is tampered with, you will receive an immediate notification
on the Balin App and via email. This way you can always keep an eye on
your vehicles and be updated in case of tampering with the GPS tracker
or theft of the vehicle.
For example, if your vehicle is stolen and the tracker cables are cut,
you will still receive a notification and can request the necessary support
immediately.
2. How to activate the device disconnected or tampered alarm
First you need to select the vehicle on which you want to arm the alarm. Then, click on the button and starts the wizard to activate the alarm.
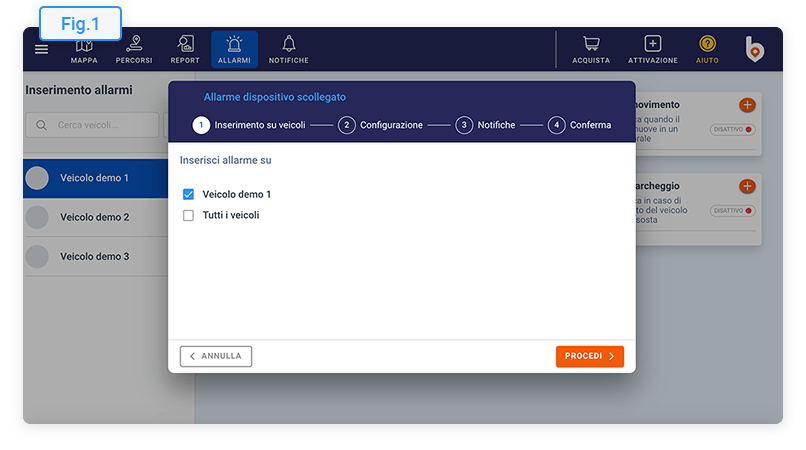
Step 1: choose whether to arm the alarm on the selected vehicle
or on all vehicles, and click on CONTINUE, as shown in Fig.1
Note: if you choose to arm the alarm on all vehicles, and there
are some vehicles that already have a disconnection alarm set, a message
will ask you if you want to replace the new alarm with the previous ones.
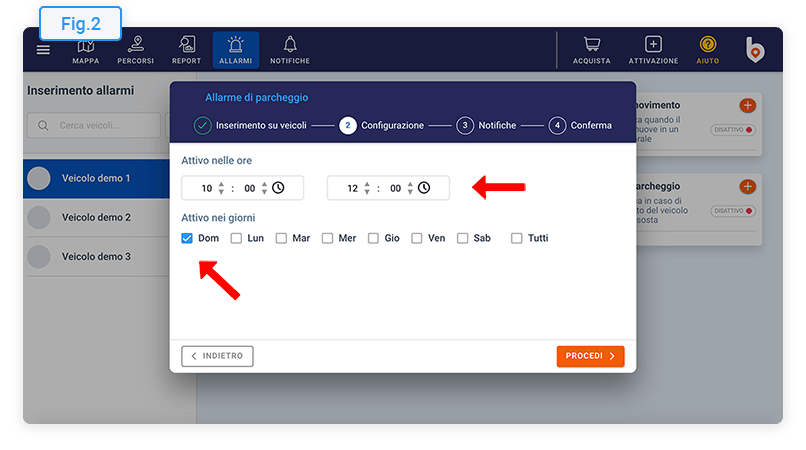
Step 2: You can choose to activate the alarm if, during the time
you set, the GPS tracker is disconnected from the power supply due to cable
cuts or tampering. In the example shown (Fig.2)
it has been established that the alarm will be triggered if the GPS tracker
is disconnected at any time of the day (from 00:00 to 23:59), every day.
According to these settings, the alarm is always active and the user will
be notified in the event of a cable cut or tampering, which causes a loss
of power to the device.
For example, suppose the vehicle is stolen and the thief removes the GPS
tracker to avoid being tracked. An immediate notification will be sent
to the user who can take action as needed.
Step 3: choose who to send notifications to when the alarm is triggered (Fig.3). Type the email addresses to which you want to send the message and click on the button to add them as recipients. You can also choose to send notifications to secondary users in Balin.app.
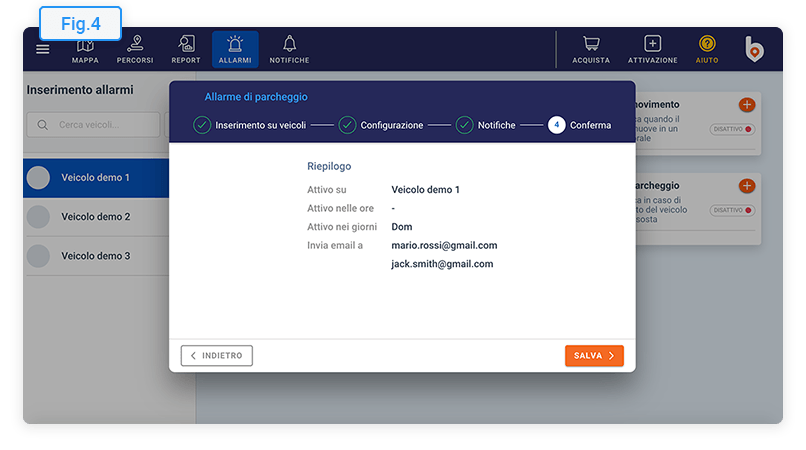
Step 4: Check the summary to verify that all settings are correct and press SAVE to confirm the alarm activation. (Fig.4).
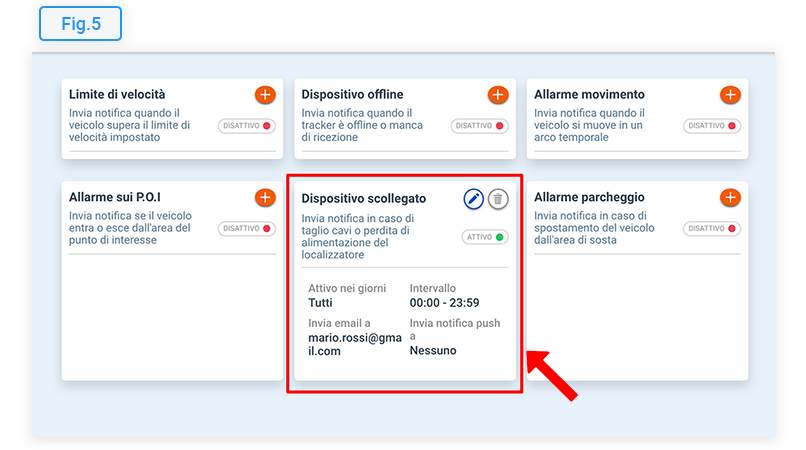
As soon as you have completed the procedure you will see that the disconnection
alarm is active with the settings you have chosen, as shown in Fig.5
Click on the pencil icon to
edit the alarm, or on the trash if
you want to delete it.


P.O.I. alert
1. How does the point of interest alarm work?
You can set an alarm on a P.O.I., or point of interest, if you want
to receive an alert every time the vehicle enters or exits a selected area.
After you have activated the alarm, if the vehicle enters or exits from
the selected P.O.I, within the set time range, you will receive an immediate
notification on the Balin App and via email. (Note: you can also
activate the alarm to be notified both when the vehicle enters and when
the vehicle leaves the selected space)
This way you can always be updated when your vehicles reach or depart
from a certain point of interest.
For example, you may find it useful to know when your vehicle arrives
at a customer to make a delivery, or when it leaves after loading the goods
at the company warehouse.
2. How to activate the alarm on points of interest
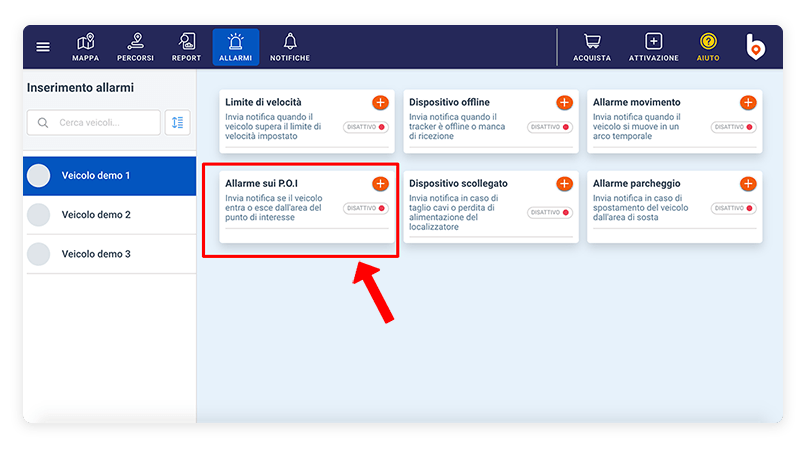
First you need to select the vehicle on which you want to arm the alarm. Then, click on the button and starts the wizard to activate the alarm.
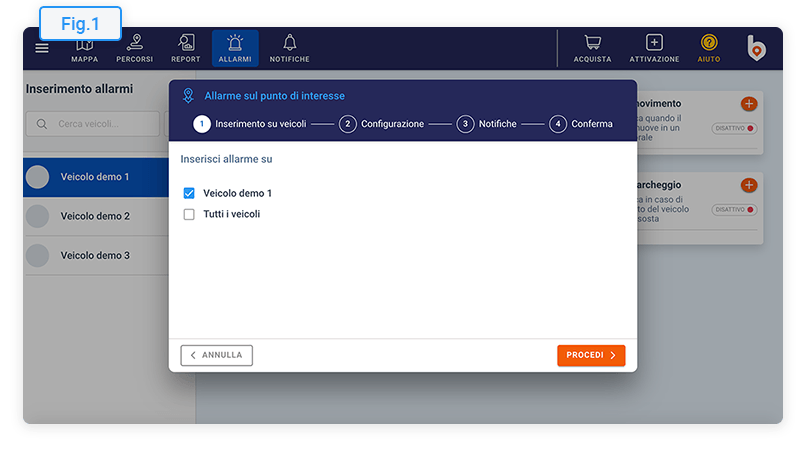
Step 1: choose whether to arm the alarm on the selected vehicle
or on all vehicles, and click on CONTINUE, as shown in Fig.1
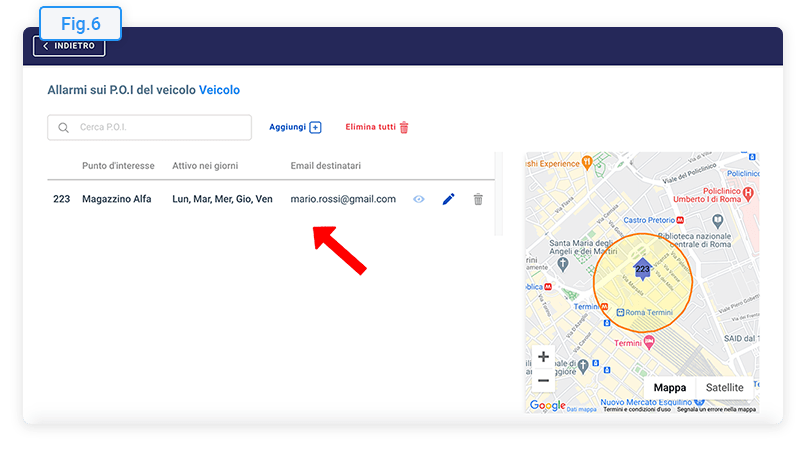
Note: unlike the other alarms, multiple alarms can be activated
on the same vehicle on different P.O.I. (See Fig.6)
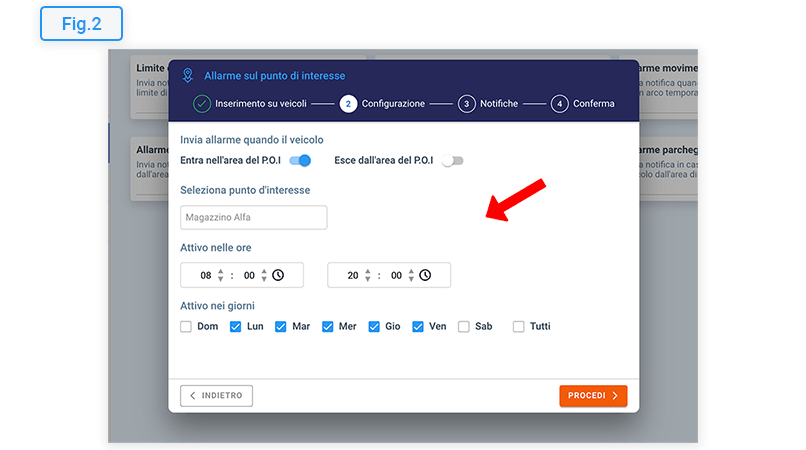
Step 2: you can choose to activate the alarm to know if, during
the time you set, the vehicle enters or exits the selected P.O.I. In the
example shown (Fig.2) it has been established
that the alarm will be triggered if the vehicle enters the P.O.I. area (Alfa Warehouse),
from 08:00 to 20:00, from Monday to Friday. According to these settings,
the user will receive a notification when the vehicle reaches the Alfa
Warehouse within the selected time range. (Note: if you also want
to be notified when the vehicle exits this point you should also enable
the Exit P.O.I. area button)
For example, suppose you want to know when one of your vehicles completes
a delivery to a customer. You will have to activate an alarm on the P.O.I.
(at the customer's address) and thus you will receive a notification when
the vehicle reaches that point.
Step 3: choose who to send notifications to when the alarm is triggered (Fig.3). Type the email addresses to which you want to send the message and click on the button to add them as recipients. You can also choose to send notifications to secondary users in Balin.app.
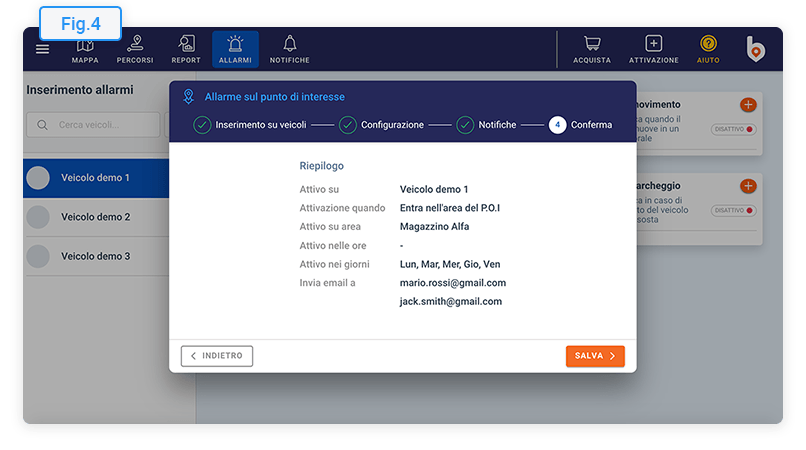
Step 4: Check the summary to verify that all settings are correct and press SAVE to confirm the alarm activation. (Fig.4).
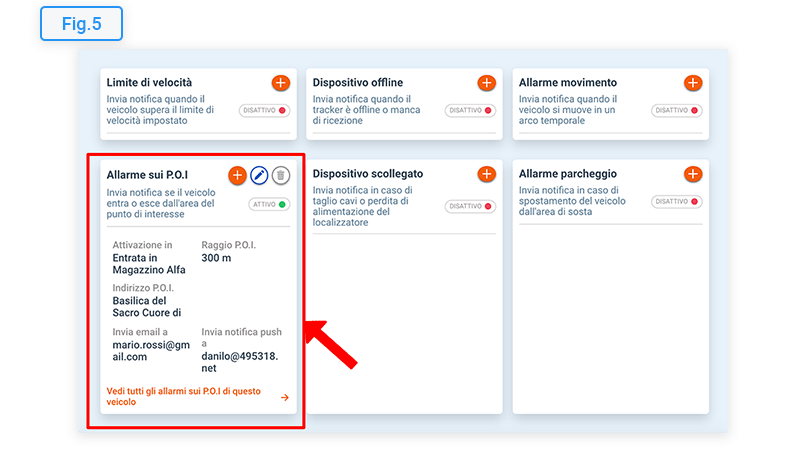
As soon as you have completed the procedure you will see that the P.O.I.
is active with the settings you have chosen, as shown in Fig.5
Click on the pencil icon to
edit the alarm, or on the trash if
you want to delete it. Or click on if
you want to add a new P.O.I. alarm on the selected vehicle.
By clicking on the link View all P.O.I. alarms for this vehicle (
Fig.5) will open a page showing all POI alarms that are active
on that vehicle (Fig.6).
On this page you can add new alarms, modify or delete the existing ones
on the selected vehicle. A map is available to help locate points of interest.